
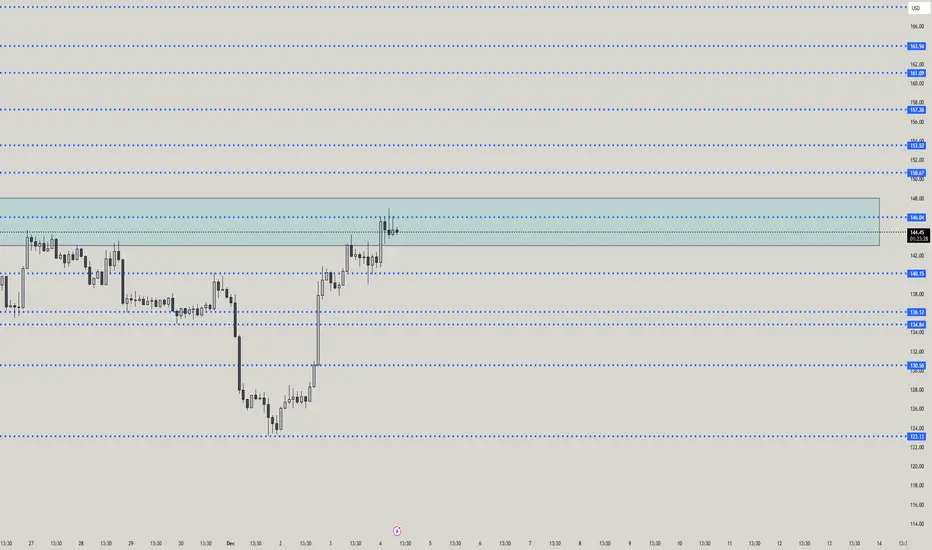
PRICE IS CURRENTLY INSIDE A SUPPLY / SELL ZONE
The light-blue highlighted area is a strong supply zone between:
🔵 Supply Zone (Sell Zone)
146.00 – 149.00
Price has tapped this zone 3 times → weakness for buyers → sellers may take control.
🚫 NO-TRADE ZONE (RIGHT NOW)
The region where price is stuck is:
🚫 No-Trade Zone: 144.00 – 146.00
Reason:
Price is consolidating
Multiple rejections
Both bulls & bears fighting
Not safe for entering until breakout or rejection confirmation
🔥 SELL SETUP (High Probability)
This is the safest setup at the moment.
📍 SELL ENTRY
146.50 – 148.50 (inside the supply zone)
🛑 SL (Stoploss)
150.50
Above previous wick + above the zone.
🎯 TP (Targets)
1️⃣ 140.15
2️⃣ 136.12
3️⃣ 134.84 → strong demand
4️⃣ 130.56 → final target
This gives excellent RR (Reward–Risk).
🟢 BUY SETUP (Only After Breakout)
Don’t buy inside the zone.
Buy only if candles close above the zone.
📍 BUY ENTRY
Above 150.00 (Breakout + Retest)
🛑 SL
147.80
🎯 TP
1️⃣ 153.50
2️⃣ 157.20
3️⃣ 163.94
🟡 BUY SETUP (Pullback Buy)
If price drops to demand zone:
📍 BUY ENTRY ZONE
140.15 – 136.12
🛑 SL
134.00
🎯 TP
1️⃣ 144.00
2️⃣ 146.00
3️⃣ 148.00
📌 SUMMARY
🚫 NO TRADE:
144.00 – 146.00
🔥 SELL SETUP:
Entry: 146.50 – 148.50
SL: 150.50
TP: 140.15 → 136.12 → 134.84 → 130.56
🟢 BUY SETUP (Breakout Buy):
Entry: Above 150
SL: 147.80
TP: 153.50 → 157.20 → 163.94
🟢 BUY SETUP (Demand Buy):
Entry: 140.15 – 136.12
SL: 134
TP: 144 – 146 – 148

Disclaimer
The information and publications are not meant to be, and do not constitute, financial, investment, trading, or other types of advice or recommendations supplied or endorsed by TradingView. Read more in the Terms of Use.
Disclaimer
The information and publications are not meant to be, and do not constitute, financial, investment, trading, or other types of advice or recommendations supplied or endorsed by TradingView. Read more in the Terms of Use.