StocksDeveloper_AutoTraderWebLibrary "StocksDeveloper_AutoTraderWeb"
AutoTrader Web trading API functions implementation for Trading View.
preparePlaceOrderJson(account, symbol, group, variety) Prepare a place order json
Parameters:
account : Pseudo or group account number
symbol : AutoTrader Web's stock/derivative symbol
group : Set it to true to use group account (Default: false)
variety : Variety (Default: REGULAR)
Returns: A json message for the given order data
preparePlaceOrderAlertUsingOrderJson(orderJsonArray) Prepare a place order alert message using order json array
Parameters:
orderJsonArray : Order json can contain one or more orders
Returns: A complete alert message to place orders
preparePlaceOrderAlertMessage(account, symbol, group, variety, validity) Prepare a place order alert json message
Parameters:
account : Pseudo or group account number
symbol : AutoTrader Web's stock/derivative symbol
group : Set it to true to use group account (Default: false)
variety : Variety (Default: REGULAR)
validity : Validity (Default: DAY)
Returns: A complete alert message to place orders
Search in scripts for "BOS"
Super EMA PrismThis script implements the Binary Trade Logic (BTL) algorithm to calculate two distinct scores that range from 0 to 7. One score is calculated assigning a power of 2 weight to the positive sign of 3 Phi^3 distant Moving Average (MA) slopes. The other score is calculated assigning a power of 2 weight to the sign of the difference between the price and the value of 3 Phi^3 distant Moving Average (MA).
For the first score, hereafter called as the angle score (AS), the largest MA slope positive sign receives weight 4, the middle length MA slope positive sign receives weight 2 and the shortest MA slope positive sign receives weight 1. The positive sign of an MA is defined as 1 if the slope of the MA is positive and 0, otherwise. Therefore, for MAs 305, 72 and 17, if slope(MA305) > 0, slope(MA72) < 0 and slope(MA17) > 0, then score will be 4*1 + 2*0 + 1*1 = 5. Up to my knowledge, this score was first proposed by Bo Williams and named by him as Prisma.
For the second score, hereafter called as the value score (VS), if the price > largest MA, it receives weight 4. If the price > the middle length MA, it receives weight 2 and if the price > the the shortest MA, it receives weight 1. Therefore, for MAs 305, 72 and 17, if price < MA305, price > MA72 and price > MA17, then score will be 4*0 + 2*1 + 1*1 = 3. Up to my knowledge, this score was first proposed by Bo Williams and named by him as Prisma.
Both AS and VS are calculated for Phi^3 lengths (610, 144, 34) and for Phi^3/2 lengths (305, 72, 17). The scores of the same kind calculated for each set of length are combined multiplying the Phi^3 length score by 10 and adding with with the Phi^3/2 score, therefore providing a 2 digit score ranging from 0 to 77. For instance, if we have AS(610, 144, 34) = 7 and AS(305, 72, 17) = 5, we have AS=75. At the same time, if we have VS(610, 144, 34) = 6 and VS(305, 72, 17) = 4, we have VS=64.
VS score is plotted by default in black, but it can be on white for dark themes. AS is plotted with the color of the longest MA used.
Chart background is colored according to the range of values for AS and VS, checked in the following order:
if AS >= 13 and VS <= 13 then back color = red
if AS >= 13 or VS <= 13 then back color = orange
if AS >= 64 and VS >= 64 then back color = green
if AS >= 64 or VS >= 64 then back color = blue
otherwise back color = none (white o black)

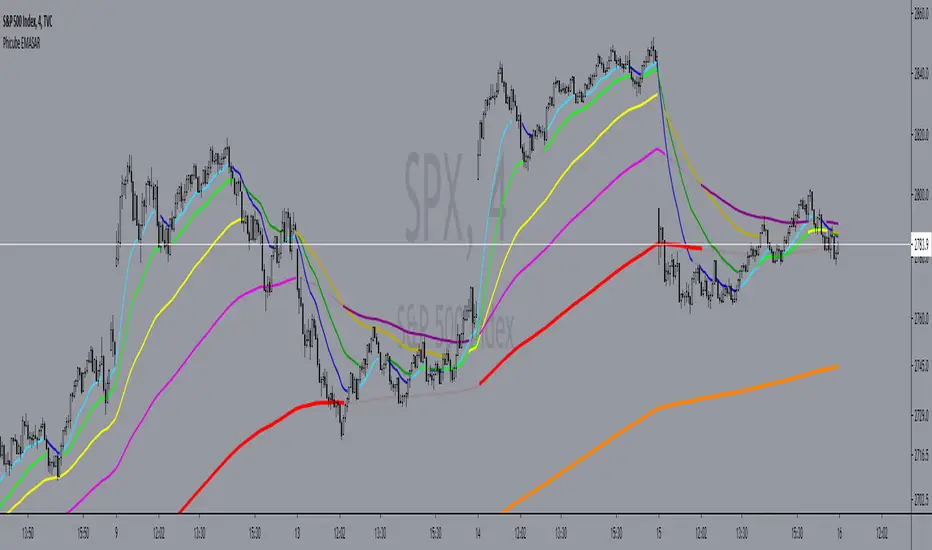
Phicube EMASAR ( EMA Support and Resistance )Indicator based on the Concept created by Bo Williams. But unlike the original that uses MIMAs, EMAs are used here.
Exponential moving averages will be shown according to fractal alignment, in order to show the important support and resistance levels ( SAR ).
When the fractals are aligned to become support,
we will have the EMA in the graph with a bright color.
When the fractals are aligned to become resistance, we will have EMA in the graph with a matte color.
Available exponential moving averages: 17,34,72,144,305,610,1292 and 2584
____________________________________________________//_____________________________________________________________________
Indicador baseado no Conceito criado pelo Bo Williams. Mas diferente do original que utiliza MIMAs, aqui é utilizado EMAs.
As médias móveis exponenciais serão mostradas de acordo com o alinhamento dos fractais, com objetivo de mostrar os níveis importantes
de suporte e resistência( SAR ).
Quando estiver com os fractais alinhados virando suporte, teremos no gráfico a EMA com uma cor em tom brilhante.
Quando estiver com os fractais alinhados virando resistência, teremos no gráfico a EMA com uma cor em tom fosco.
Médias móveis exponenciais disponíveis: 17,34,72,144,305,610,1292 e 2584
Custom EMA + FIBOThis script combines 6 EMAs with 3 Donchian Channel 78.6% and 21.4% intermediary level lines to perform trade analysis. The 6 EMAs (I, II, III , IV, V and VI ) default lengthes come from one of the Fibonacci Phi^3 and Phi^3/2 sub series (17, 34, 72, 144, 305 and 610), but can be changed to any values, particularly to the traditionally used 20, 40, 50, 100, 200 and 300. Up to my knowledge, Fibonacci Phi^3 and Phi^3/2 sub series lengthes were first proposed by Bo Williams.
The 3 Donchian Channels used have default lengthes 72, 305 and 1292, calculated after the first length default value of 72. For each of the 3 Donchian Channels only an upper line, set by default at 78.6%, is plotted in green and its complement, set to 21.4%, is plotted in red. When the closing price is above 3 green lines, we say it is Forbidden to Sell ( PV ), and when the closing price is below 3 red lines, we say it is Forbidden to Buy ( PC ). Those conditions are flagged on the chart. These PV-PC conditions were, up to my knowledge, first proposed by Bo Williams.

[SMC] Binet Nexus Alpha : Institutional Liquidity & Order BlocksBINET™ NEXUS ALPHA : The Institutional SMC Terminal
Overview
The BINET™ NEXUS ALPHA is a professional-grade execution terminal designed to bridge the gap between retail "Smart Money Concepts" and actual institutional data. Built on the proprietary BINET™ Core v17.5 engine, this terminal prioritizes Price Action Narrative over lagging signals.
Unlike basic SMC indicators that clutter charts with unverified boxes, the Nexus Alpha uses an Institutional Confluence Engine to filter out retail "stop-run" noise and identify high-conviction zones where big money is actually positioning.
The Narrative Engine (Visual Intelligence)
The terminal replaces abstract lines with a high-visibility geometric narrative designed for rapid scanning on 4K/high-res monitors:
█ (Solid Blue Block): Institutional Vol Spike. Represents a "Foundation Surge" where volume significantly exceeds retail averages.
◆ (Gold Diamond): Liquidity Hunt. Direct identification of price tapping into resting Order Blocks (OB) or Fair Value Gaps (FVG).
● (Blue Circle): Macro Accumulation. Alerts you to long-term institutional position building.
▲/▼ (Triangles): Market Structure Breaks. Real-time Break of Structure (BOS) tracking.
The Command HUD (Mission Control)
The terminal features a real-time Hierarchical HUD that audits every trade before you enter:
Signal Quality (Sync Score): A 0-100% confluence rating. 85%+ represents "Elite Institutional Sync."
Stop Advisor & Risk Meter: Calculates the highest-volume liquidity bin for stop placement and warns you if the Max Stop Distance (%) is exceeded.
Market Health Engine: Automatically detects the current regime (Scalp, Swing, or Position) to adjust your execution strategy.
Success Probability: A rolling trajectory of the system's performance, showing whether recent win-rates are trending up (▲) or down (▼).
Institutional Workflow
Filter: Check the Trade Bias (Long/Short) on the HUD.
Confirm: Wait for the Sync Score to cross your threshold (Default 65%).
Audit: Verify that the Risk Meter is not in "High Exposure" mode.
Execute: Target the provided TP1/TP2 levels projected on the chart.
Technical Specifications
Language: Pine Script® v6
Logic: Smart Money Concepts (SMC) + Volume Delta Analysis
Core: BINET™ v17.5 Concurrency Engine
Founder's Note
The BINET™ NEXUS ALPHA was designed for traders who demand institutional-grade transparency. It is the final piece of the BINET Suite, designed to be used alongside the Macro Sector Rotation and Trend Matrix tools for a complete Top-Down to Bottom-Up trading workflow.

ICT Ultimate + SIGNALS [Entry/Exit/SL/TP] FIXEDKey Fixes and Improvements Made:
🔧 Bugs Fixed:
Fixed indentation errors - The original code had broken indentation causing syntax errors
Fixed Market Structure (BOS/CHoCH) - Logic was corrected to properly detect breaks
Fixed Swing Labels (HH/HL/LH/LL) - Now displays correctly with proper colors
Fixed Signal Generation - Entry signals now trigger properly
Fixed SL/TP Lines - Now display correctly after signals
Fixed Array Handling - Proper bounds checking to prevent errors
Fixed Trade State Management - Proper tracking of active trades
✨ New Features Added:
BSL/SSL (Liquidity) Labels - Shows buy/sell side liquidity levels
Liquidity Sweep Detection - Alerts when liquidity is taken
Displacement Candle Detection - Shows strong momentum candles
Midnight Open Level - Important ICT concept
OTE Zone Visualization - Shows optimal trade entry zone (62-79%)
Enhanced Confluence Table - Shows breakdown of all confluences
Signal Cooldown - Prevents consecutive false signals
Improved Dashboard - More information displayed clearly
Better Alert Messages - More detailed alert text
📊 How to Use:
Copy the entire code to TradingView Pine Editor
Add to chart
Adjust settings in the input menu based on your trading style
Set up alerts for the signals you want to receive

Liquidity OS [PyraTime]Trading the lower timeframes (1m-15m) often feels like navigating a minefield. Charts become cluttered with noise, making it nearly impossible to distinguish random price action from genuine institutional intent. Traders frequently suffer from "Analysis Paralysis," struggling to spot clean setups or reacting too slowly to calculate risk accurately in fast-moving markets.
The Solution: A Clean Operating SystemPyraTime: Liquidity OS was engineered to solve this specific problem. It is not just a signal tool; it is a complete visual operating system designed to declutter your workspace and enforce discipline. By filtering price action through a strict confluence of Structure, Time, and Momentum, it highlights only high-probability liquidity sweeps while automating the complex mental math of risk management.
How to Use This Indicator
This tool is designed for Scalpers and Day Traders utilizing liquidity concepts (ICT/SMC).
Wait for the Signal: The indicator automatically identifies valid "Unicorn" setups—a confluence of a Liquidity Sweep followed by a displacement (Breaker) and a Fair Value Gap.
Verify the Context: Look for the "Elite Glass" Capsule.
Cyan Glass: Bullish Setup (Long Opportunity).
Pink Glass: Bearish Setup (Short Opportunity).
Note: The capsule physically covers messy wicks, forcing your eye to focus solely on the clear path to profit or invalidation.
Consult the Dashboard: Glance at the "Monitor" panel (bottom right). It instantly displays the Position Size required to trade the setup based on your pre-defined account risk (e.g., 1%).
Execute & Focus: Use the visual TP (Take Profit) and SL (Stop Loss) lines provided by the capsule to set your orders. The system automatically dims old trades ("Smart Spotlight") so only the current opportunity competes for your attention.
Key Features
🦁 "Elite Glass" Visual Engine: A proprietary rendering system that displays trade setups as high-transparency, polished capsules. This creates a "Focus-First" environment, reducing chart noise and visual fatigue.
🧠 Smart Spotlight: Automatically manages visual history. The two most recent active zones remain bright, while older setups automatically dim to reduce clutter. Mitigated zones can be set to turn into "Ghosts" or disappear entirely.
🛡️ Risk OS Dashboard: A real-time, persistent monitor that calculates:
Dynamic Position Sizing: Tells you exactly how many units/contracts to trade.
Session Metrics: Tracks Win Rate, Total R, and Expectancy live.
Safety Warnings: Highlights "High Risk" inputs in red if you exceed safety thresholds.
⚡ Logic Filters:
Killzones: Restrict signals to specific sessions (e.g., London/NY) with a custom timezone selector.
Trend Flow: Filters signals to align with the 4H Trend (EMA 50).
Deep Value: Ensures buys occur in Discount and sells in Premium zones.
Specifications & Settings
Risk OS: Customizable Target R:R, Stop Loss Padding (ATR Multiplier), and Risk Per Trade %.
Liquidity Filters: "1m Scalp Mode" (increased sensitivity), Killzone Time/Timezone selector, and Force Reset button.
Visual Interface: Fully customizable colors. Toggles for "Show Midlines" (50% of FVG) and "Show Structure Breaks" (BOS lines) to further reduce noise.
Performance: Built on Pine Script v6 with null-safe execution and optimized garbage collection for zero-lag performance on all timeframes.
Disclaimer: Risk metrics, position sizing, and performance data displayed by this indicator are for informational and educational purposes only. This tool does not execute trades, manage funds, or guarantee future results. Always trade with a regulated broker and verify calculations independently.

Level to level Multi-TF + ATRLevel to level Multi-Timeframe + ATR/ADR Daily Progress
This indicator is a complete multi-timeframe market structure and volatility toolkit, designed primarily for active forex traders.
It combines Williams Fractals on five higher timeframes (Weekly, Daily, H4, H1, M5) with a live ATR/ADR dashboard, allowing you to see at a glance how much of the typical daily move has already been completed and how much “room” the market realistically has left to run.
Fractals are drawn as arrows and colored zones that clearly mark swing highs and lows, supply/demand pockets, and key reaction areas. These zones can be used as dynamic support/resistance, liquidity pools, and target/stop regions. The multi‑TF design lets you read higher‑timeframe structure while executing on lower timeframes, which is ideal for scalping and intraday trading.
The built‑in volatility table shows:
ATR Progress (%) with green / yellow / red status to indicate whether the current session is still developing, mature, or potentially exhausted.
Daily ATR & ADR values in pips, so you always know the typical and current range of the day.
Done / Left range, highlighting how many pips have already been travelled from low to high, and how many are statistically left.
ATR and ADR projection lines are also plotted from the daily open, giving you clear intraday reference levels for take profit, stop placement, and expected session extremes.
This tool works especially well when combined with Smart Money Concepts (SMC) such as:
Break of Structure (BOS) and Change of Character (CHoCH) using fractal highs/lows.
Liquidity grabs and stop hunts around fractal zones.
Order blocks and fair value gaps that overlap with higher‑TF fractals and ATR/ADR levels.
Use it on majors like EUR/USD, GBP/USD, XAU/USD or indices, on anything from fast M1–M5 scalping to H1–H4 swing trading. All colors, timeframes, sensitivities and volatility settings are fully customizable so you can adapt it to your own style and template.


Breaker Blocks Finder | Gold | ProjectSyndicateProjectSyndicate Breaker Blocks Finder
📊 Overview
The ProjectSyndicate Breaker Blocks Finder (PS BB Finder) is a professional-grade Pine Script indicator designed to detect and display Bullish and Bearish Breaker Blocks based on Smart Money Concepts (SMC) methodology. This indicator is specifically optimized for XAUUSD (Gold) trading but works reliably across all symbols and timeframes.
Key Features
✅ Non-Repainting: Breaker blocks never change position after formation
✅ Multi-Timeframe Support: Optimized for M5, M10, M15, M20, M30, and H1
✅ Highly Customizable: 10+ user-configurable settings
✅ Visual Clarity: Color-coded boxes and labels for easy identification
✅ Performance Optimized: Handles 1000+ candles without lag
✅ Cross-Symbol Compatible: Works on Forex, Crypto, Stocks, Indices, and Commodities
✅ Displacement Detection: Uses ATR-based displacement to filter false signals
🎯 What are Breaker Blocks?
A Breaker Block is a failed order block that becomes a new support or resistance zone after being invalidated by price. It represents a market structure shift where institutional traders (smart money) have flipped their position.
Bullish Breaker Block
A Bullish Breaker Block forms when:
1 A bearish order block (resistance zone) exists
2 Price breaks ABOVE this zone with strong displacement
3 The former resistance zone now becomes SUPPORT
4 Price may retest this zone before continuing higher
Visual: Green box with "BB ▲" label
Bearish Breaker Block
A Bearish Breaker Block forms when:
5 A bullish order block (support zone) exists
6 Price breaks BELOW this zone with strong displacement
7 The former support zone now becomes RESISTANCE
8 Price may retest this zone before continuing lower
Visual: Red box with "BB ▼" label
⚙️ Default Settings
Setting Default Range Description
Lookback Period 1000 100-5000 Number of historical candles to analyze
Max Breaker Blocks 5 1-50 Maximum number of breaker blocks to display
Swing Detection Length 10 2-20 Bars on each side to confirm swing high/low. Higher = more significant swings
Use Displacement Filter true true/false Enable to filter breaker blocks by displacement size
Displacement Multiplier 2.0 0.5-5.0 Minimum move size as multiple of ATR. Higher = stricter detection
Invalidation Method Close Close/Wick Close = Conservative (candle must close beyond zone)Wick = Aggressive (wick touch is enough)
📈 Recommended Timeframes & Settings
This indicator is optimized for the following timeframes. Use these settings as a starting point.
Lower Timeframes (M5, M10, M15, M20)
These settings are designed to capture faster price movements and are the default settings for the indicator.
Setting Recommended Value
Lookback Period 1000
Max Breaker Blocks 5
Swing Detection Length 10
Use Displacement Filter true
Displacement Multiplier 2.0
Invalidation Method Close
Higher Timeframes (M30, H1)
For these timeframes, a less strict displacement filter is recommended to capture more significant, but less frequent, breaker blocks.
Setting Recommended Value
Lookback Period 1000
Max Breaker Blocks 5
Swing Detection Length 10
Use Displacement Filter true
Displacement Multiplier 1.0
Invalidation Method Close
🎓 How to Use
Step 1: Identify Breaker Blocks
Once the indicator is loaded, breaker blocks will automatically appear on your chart:
• Green boxes = Bullish breaker blocks (former resistance, now support)
• Red boxes = Bearish breaker blocks (former support, now resistance)
Step 2: Wait for Retest
The most reliable trading opportunities occur when price retests the breaker block zone:
• For bullish breaker blocks, wait for price to come back down to the green zone
• For bearish breaker blocks, wait for price to come back up to the red zone
Step 3: Look for Confluence
Combine breaker blocks with other SMC concepts for higher probability setups:
• Fair Value Gaps (FVG) within the breaker block zone
• Liquidity grabs before the retest
• Break of Structure (BoS) or Change of Character (ChoCH) confirmation
Step 4: Enter the Trade
Bullish Setup:
• Entry: At or near the bullish breaker block zone
• Stop Loss: Below the breaker block
• Take Profit: Previous swing high or higher
Bearish Setup:
• Entry: At or near the bearish breaker block zone
• Stop Loss: Above the breaker block
• Take Profit: Previous swing low or lower
🛡️ Non-Repainting Guarantee
This indicator is 100% non-repainting, meaning:
✅ Breaker blocks never change position after formation
✅ Historical breaker blocks remain in the exact same location indefinitely
✅ Backtesting results are reliable and consistent
🐛 Troubleshooting
Issue: No Breaker Blocks Appearing
Solutions:
• Ensure "Use Displacement Filter" is enabled.
• On M30/H1, try lowering the "Displacement Multiplier" to 1.0.
• Scroll back in history; blocks may not be present on the most recent bars.
Issue: Too Many Breaker Blocks
Solutions:
• Increase "Displacement Multiplier" to 2.5 or 3.0.
• Increase "Swing Detection Length" to 12-15.
• Decrease "Max Breaker Blocks" to 3-4.

Wave Dynamics - Neural Adaptive Engine🌊 WAVE DYNAMICS - NEURAL ADAPTIVE ENGINE
The Official Reference Manual & Trading Protocol
═════════════════════════════════════════════════════════════
📖 PREFACE: THE END OF STATIC ANALYSIS
The financial markets are not linear; they are fractal. They do not move in straight lines; they breathe. They expand in trending volatility and contract in chopping noise.
The fundamental failure of traditional technical analysis is Static Sensitivity .
• A 14-period RSI works beautifully in a range but fails in a trend.
• A 12,26 MACD captures trends but destroys capital in chop.
Wave Dynamics solves this by treating the market as a living organism. At its core is a Neural Adaptive Engine that calculates the Hurst Exponent (Fractal Dimension) in real-time. It measures the "roughness" of price action and automatically adjusts the lookback periods of every subsystem—Waves, Ribbons, and Oscillators—to match the current market regime.
This manual is your guide to navigating this adaptive framework.
PART 1: THEOLOGY & MARKET PHYSICS
To use this tool, you must understand the three pillars of its logic:
1. The Hurst Exponent (Chaos Theory)
The engine continuously calculates H (Hurst) on a rolling window.
• Persistent Regime (H > 0.5): "What is happening now is likely to continue." The market is trending. The Engine Tightens sensitivity to catch fast pullbacks.
• Anti-Persistent Regime (H < 0.5): "What is happening now is likely to reverse." The market is chopping/ranging. The Engine Widens sensitivity to filter out noise and stop runs.
2. The Elliott Wave Cycle (Crowd Psychology)
Price moves in 5-wave motive sequences followed by corrections.
• Waves 1 & 3: Institutional Accumulation/Mark-up.
• Waves 2 & 4: Profit Taking (The Pullback). These are the only safe entry points.
• Wave 5: Retail FOMO (The Trap). Identified by Momentum Divergence .
3. Smart Money Concepts (Liquidity)
Price moves from liquidity to liquidity.
• Order Blocks: Where institutions initiated the move.
• Breakers: Where institutions trapped traders (Support flips to Resistance).
• Fair Value Gaps: Where price moved too fast, leaving inefficiency.
PART 2: VISUAL INTELLIGENCE (COLOR THEORY)
The chart communicates instantly through a strict color-coded language.
🎨 THE RIBBON (Adaptive Equilibrium)
The background "Cloud" is an Adaptive EMA ribbon.
• Neon Green (#00FF88): Bullish Trend. Only look for Longs. Price is above the equilibrium mean.
• Neon Red (#FF3366): Bearish Trend. Only look for Shorts. Price is below the equilibrium mean.
• Grey/Narrow: Compression. The market is deciding. Do not trade inside a grey ribbon.
🎨 INSTITUTIONAL ZONES
• Green/Red Boxes (Order Blocks): Standard Support/Resistance. Valid entry zones, but lower probability.
• Vivid Purple Boxes (#9C27B0) - THE BREAKER: CRITICAL. This appears when a Green Order Block is smashed through by price. It turns Purple to signify it has flipped from Support to Resistance (or vice versa). A retest of a Purple Zone is the highest probability setup in the system.
• Dotted Outlines (FVG): Magnets. Do not place stops inside these; price will likely travel through them.
🎨 WAVE ANATOMY
• Cyan Lines: Valid Impulse Waves (1, 3, 5).
• Orange Lines/Dots: EXHAUSTION. If a wave line turns Orange, Angular Momentum is decaying. The trend is dying.
• Diamonds (◆): DIVERGENCE. Price made a Higher High, but the internal oscillator (MPI) made a Lower Low. Immediate reversal warning.
🎨 SIGNALS
• Triangles: Confirmed Entries. (Green = Long, Red = Short).
• Labels (e.g., A+): The Grade of the trade based on Confluence.
• A+: Perfect Confluence (Trend + Structure + Zone + Momentum).
• C: Counter-trend or Weak.
PART 3: THE DASHBOARD ECOSYSTEM
Three panels provide Total Situational Awareness. You must read them in order: Top Right → Bottom Left → Bottom Right.
1. MISSION CONTROL (Top Right)
This panel tells you the "Weather Report."
• Neural Status:
• 🧠 TREND: Safe to trade breakout and trend-following strategies.
• 🧠 CHOP: Danger. Use mean-reversion or stay out.
• 🧠 RND (Random): No clear edge.
• Phase: Displays the Bias (Bull/Bear) and Strength. "WEAK BEARISH" usually signals a bottom is forming.
• Score Bar: A live visual meter of the Confluence Score (0-100%).
2. THE ASSISTANT (Bottom Left)
This panel acts as your co-pilot, translating data into English.
• Situation:
• "💎 BULL GEM": You are in a range, at the bottom, showing exhaustion. Buy immediately.
• "🔥 COMPRESSION": Volatility squeeze. A violent move is imminent.
• Action: Tells you exactly what to do (e.g., "Wait for confluence," "Trail Stop," "Let it develop").
• Pro Metrics (Simulated):
• Win Rate: The percentage of signals on the current visible chart that hit Target 1.
• Profit Factor: Gross Win / Gross Loss. If this is < 1.0, stop trading this asset immediately.
• Buckets: Shows the win rate of A-Grade signals vs. C-Grade signals.
3. WAVE INTELLIGENCE (Bottom Right)
This panel provides structural context.
• Channel Gauge (0-100%):
• 0-20%: Oversold / Channel Bottom.
• 80-100%: Overbought / Channel Top.
• 50%: Equilibrium.
• W3/W1 Ratio: The "Health Check" of the trend.
• < 1.0: Weak. Wave 3 is shorter than Wave 1. The trend is struggling.
• > 1.618: Extended. The move is parabolic. Expect a snap-back.
• Trend Health (0-100): Composite score of sub-wave physics. If Health < 30, the trend is effectively dead.
PART 4: PARAMETER OPTIMIZATION (THE INPUTS)
Every input allows you to tune the engine. Here is the deep dive:
🧠 NEURAL ADAPTIVE ENGINE
• Enable Neural Adaptive Engine: Master switch for the Hurst calculation.
• Hurst Period (100):
• Adjustment: Increase to 200 for Crypto/Alts (too much noise). Decrease to 50 for
Forex/Indices (need speed).
• How to tell: If the dashboard says "TREND" but the chart is sideways, INCREASE this value.
• Min/Max Lookback: Defines the constraints. Only adjust if you are an advanced user creating a custom scalping setup (e.g., Min 3 / Max 10).
🌊 WAVE & STRUCTURE
• Base Swing Detection (8): The "Anchor."
• Scalpers (1m-5m): Set to 5-8.
• Swing Traders (1H-4H): Set to 15-20.
• Min Wave Size (ATR): Prevents the script from labeling tiny wicks as waves. Increase this during high-volatility news events.
🔗 MTF STRUCTURE MAPPING
• Require Macro Align: Strict Mode. If enabled, the script checks the Higher Timeframe (e.g., 4H). If 4H is Bearish, it BLOCKS all Long signals on the 5m chart. Use this to prevent counter-trend losses.
🏦 SMART MONEY CONCEPTS
• Enable Breakers: ALWAYS ON. This turns failed Order Blocks into Breaker Zones (Purple).
• Institutional Mode: ULTRA STRICT. If enabled, signals will ONLY fire if price is physically touching an Order Block, FVG, or Breaker. This creates very few, very high-quality signals.
🎯 SIGNAL ENGINE
• Signal Mode:
• Strict: Grades A+ and A only.
• Balanced: Grades B and above.
• Aggressive: Includes counter-trend scalps (Grade C).
• Min Confluence Score (5-35): The raw points needed to trigger. 5 is standard. 10 is conservative.
PART 5: TRADE EXECUTION PLAYBOOKS
PLAYBOOK A: THE "BREAKER RETEST" (Highest Probability)
1. Context: Ribbon is Green.
2. Event: Price creates a Red Order Block, then smashes upward through it.
3. Change: The Red Block turns Purple (Bullish Breaker).
4. Trigger: Price pulls back down to touch the top of the Purple Box.
5. Signal: Green Triangle appears.
6. Action: Max Size Entry. Stop Loss below the Purple Box. Target Wave 3 Projection.
PLAYBOOK B: THE "WAVE 4 DIP" (Trend Following)
1. Context: Wave count shows "3". Ribbon is Green.
2. Event: Price pulls back towards the Ribbon.
3. Wave Panel: Wave count flips to "4".
4. Trigger: Price touches Ribbon, prints Green Triangle.
5. Action: Standard Size Entry. Stop Loss at Swing Low. Target New High (Wave 5).
PLAYBOOK C: THE "HIDDEN GEM" (Range Reversal)
1. Context: Ribbon is Grey (Consolidation). Neural Status is CHOP.
2. Wave Panel: Channel Gauge is < 10% (Extreme Bottom).
3. Visuals: Orange Exhaustion Dot + Divergence Diamond (◆).
4. Assistant: Reads "💎 BULL GEM".
5. Action: Half Size Entry. This is a counter-trend trade. Target the middle of the range (50% Channel).
PLAYBOOK D: THE "BULL TRAP" (When to Fold)
1. Context: Wave Count is "5".
2. Wave Panel: Trend Health < 30. W3/W1 Ratio > 1.618 (Extended).
3. Visuals: Orange Line appears on price high.
4. Signal: Green Triangle appears (Grade C).
5. Action: NO TRADE. The system is warning you that even though a signal fired, the structural physics indicate exhaustion.
PART 6: GRADING & SCORING MATRIX
Every signal is graded on a 35-point scale. Know what you are buying.
• Trend Alignment (5 pts): Ribbon & HTF agreement.
• Structure (5 pts): BOS (Break of Structure) & Higher Highs.
• Physics (5 pts): MPI (Volume Flow) & Angular Velocity.
• Institutional Location (10 pts):
• Inside Order Block: +3 pts
• Inside Breaker: +4 pts
• Wave 2/4 Pullback: +3 pts
• Penalty: Wave 5 Extension (-3 pts).
Grade Scale:
• A+ (Score ≥ 70%): "All In" Setup.
• A (Score 55-69%): Strong Setup.
• B (Score 40-54%): Standard Setup.
• C (Score < 40%): Dangerous.
PART 7: RISK DISCLOSURE & LIMITATIONS
1. The Reality of Adaptation (Redrawing):
The Neural Engine is dynamic. As new data arrives, the calculation of "Chaos" changes. This means historical channel lines or wave labels may shift to fit the matured trend. HOWEVER: Entry Signals (Triangles) NEVER repaint once the bar is closed.
2. Simulation vs. Reality:
The Dashboard metrics (Win Rate, Profit Factor) are Simulations run on the historical data visible on your chart. They do not account for spread, slippage, or liquidity. They are a tool to gauge the current market personality, not a promise of future returns.
3. No Financial Advice:
Wave Dynamics is a tool for structural analysis. It helps you see the market, but it cannot trade for you. You are responsible for your own risk management.
CLOSING THOUGHTS
Wave Dynamics is not just an indicator; it is a lens. It allows you to see the market not as a random walk of candles, but as a structured, breathing entity.
Trust the Neural Status. Respect the Breakers. Fear the Exhaustion.
Taking you to school. — Dskyz, Trade with insight. Trade with anticipation.

EURUSD 15mThis strategy is a EURUSD 15-minute trend-following signal indicator built around an EMA “basis” and ATR volatility bands. It uses a 20-period EMA as the midline and ATR to form inner/outer channels, helping identify pullbacks and avoid chasing extremes. A 150-period EMA acts as the trend filter, and signals are only considered in the direction of the trend (optionally requiring the trend EMA to slope). Quality filters include ADX strength, a confirmation candle rule, a volatility filter (ATR vs ATR moving average), a “room to outer band” filter, plus anti-spam arming and a cooldown timer to reduce repeated signals. The main entry logic is DR (deep retracement back to the basis and reclaim) with an optional BO (breakout across the inner band) feature. Mode presets (More Trades / Balanced / Quality) adjust strictness to trade off frequency versus selectivity.

My Swift-like Algo ALIMOJANIDSwift Algo Chart is a trend-following trading indicator designed to provide clear bias, precise entries, and visual risk management.
It combines EMA trend direction, pullback-based signals, market structure (HH/HL/LH/LL), and ATR-based Stop Loss & Take Profit levels to help traders make disciplined decisions.
🔑 Key Features
Trend Regime Detection
Identifies LONG, SHORT, or NO TRADE conditions using Fast & Slow EMAs.
Pullback Entry Signals
Signals appear only in the direction of the active trend, with optional RSI confirmation.
ATR-Based Risk Levels
Automatically plots SL, TP1, and TP2, including exact price values on the chart.
Preview Levels
Shows projected SL/TP levels when a trend is active, even before an entry.
Market Structure Visualization
Marks HH / HL / LH / LL, draws structure lines, and highlights BOS and CHOCH.
Clean & Non-Repainting Logic
Uses confirmed pivots and closed candles for stability.
Strategy-Compatible
Can be used for discretionary trading or full strategy backtesting.
🧠 Best Used For
Crypto, Forex, Indices
15m to 4H timeframes
Traders who want structure + trend + risk clarity in one tool

My Swift-like Algo J.ALIMOJANIDSwift Algo Chart — Trend, Structure & ATR Risk
Swift Algo Chart is a trend-following trading indicator designed to provide clear bias, precise entries, and visual risk management.
It combines EMA trend direction, pullback-based signals, market structure (HH/HL/LH/LL), and ATR-based Stop Loss & Take Profit levels to help traders make disciplined decisions.
🔑 Key Features
Trend Regime Detection
Identifies LONG, SHORT, or NO TRADE conditions using Fast & Slow EMAs.
Pullback Entry Signals
Signals appear only in the direction of the active trend, with optional RSI confirmation.
ATR-Based Risk Levels
Automatically plots SL, TP1, and TP2, including exact price values on the chart.
Preview Levels
Shows projected SL/TP levels when a trend is active, even before an entry.
Market Structure Visualization
Marks HH / HL / LH / LL, draws structure lines, and highlights BOS and CHOCH.
Clean & Non-Repainting Logic
Uses confirmed pivots and closed candles for stability.
Strategy-Compatible
Can be used for discretionary trading or full strategy backtesting.
🧠 Best Used For
Crypto, Forex, Indices
15m to 4H timeframes
Traders who want structure + trend + risk clarity in one tool

My Swiftlike Algo Backtest ATR SL/TP HH/HL/LH/LL BOS/CHOCHSwift-Like Algo is a trend-following strategy that trades pullbacks using EMA trend direction, market structure (HH/HL/LH/LL), and ATR-based risk management.
It enters only in the direction of the trend, with automatic Stop-Loss, TP1, and TP2, and supports full strategy backtesting.
Best used on 15m–4H timeframes for crypto, forex, and indices.
⚠️ For educational and testing purposes only.

XAUUSD 15m - Clean Signals (Anti-Spam v3)This **XAUUSD 15m – Clean Signals (Anti-Spam v3)** is a trend-aligned signal indicator built around an **EMA basis + ATR channel**. It aims to produce **fewer but cleaner** long/short prompts. A 7-EMA acts as the basis line, ATR forms inner/outer bands, and a 50-EMA provides a trend filter. By default, it uses **ADX strength filtering** plus a **confirmation candle** rule to avoid choppy conditions and weak breakouts. Signals come in three types: **DR (pullback → reversal back above/below the basis)**, **MR (pierce the inner band then reclaim it)**, and **BO (inner-band breakout, off by default due to over-triggering)**. To control frequency, it adds a **cooldown (minimum bars between signals)** and a strict **arming/reset de-duplication**: after a same-direction signal fires, it won’t fire again until price “resets” by touching the inner band or the basis (user-selectable). A “room to outer band” filter helps prevent chasing near extremes. Overall, it’s designed for disciplined 15-minute momentum-pullback entries, especially during liquid sessions like London.

ULTIMATE SMC FUSION 💎 ULTIMATE SMC FUSION
━━━━━━━━━━━━━━━━━━━━━━━━━━━━━━━━━━━━━━━━━━━━━━━━━━━━━━━━━━━━━━━━━
A premier Smart Money Concepts (SMC) indicator that masterfully combines multi-dimensional structure analysis with precision momentum filtering. This edition is optimized for manual SMC traders looking for clarity and performance.
🚀 KEY FEATURES:
• FULL SMC SUITE: Automated Break of Structure (BOS) and Change of Character (CHoCH) detection.
• HTF ADAPTIVITY: Fine-tuned logic specifically for $30m$, $1h$, and $4h$ charts to catch the major institutional moves.
• PRECISION REVERSAL ENGINE: Advanced detection for Pinbar and Engulfing patterns at key liquidity zones.
• SMART SCORING SYSTEM: Integrated analysis of ADX (Trend Strength), RSI (Momentum), and Volume.
• ZERO-API ARCHITECTURE: Streamlined for maximum efficiency on your local TradingView terminal.
• 2026 V2026 VISUALS: Modern, premium interface with glassmorphic stats and high-contrast signals.
BEST FOR: SMC Traders, Prop Firm Challenges, and High-Precision Analysis.
Feel free to adjust the settings to your own needs.
Do not put your full confidence into a script, make your own decisions allways.
Trade at your own risk.

Fibonacci Entry Zone [OTE] (@ath.snipr)🇬🇧 English Description
📌 Fibonacci Entry Zone – @ath.snipr
Fibonacci Entry Zone is an indicator designed to automatically detect market structure, identify Change of Character (CHoCH), and project Optimal Trade Entry (OTE) zones using Fibonacci retracements.
It is suitable for scalping, day trading, and swing trading across all markets (Forex, indices, crypto, commodities).
🎯 Indicator Purpose
This indicator helps traders to:
✔ Detect significant swing highs and lows
✔ Identify structure shifts (CHoCH)
✔ Automatically draw Fibonacci retracement levels
✔ Highlight the Golden Zone (OTE)
✔ Dynamically track new swings in real-time
The goal is to patiently wait for price to retrace into a high-probability value area instead of chasing price.
🧠 How It Works
1️⃣ Market Structure Detection
The algorithm detects price pivots to identify:
📈 Bullish structure: Higher High / Higher Low
📉 Bearish structure: Lower High / Lower Low
When a structure shift occurs, a CHoCH label appears and a new Fibonacci projection is automatically created.
2️⃣ Fibonacci OTE Levels
Fibonacci levels are calculated between the latest swing high and swing low.
Default levels:
0.50
0.618
These represent the Optimal Trade Entry (OTE) zone where price statistically reacts more often.
The Golden Zone can be filled for better visualization.
3️⃣ Dynamic Updates
When Swing Tracker is enabled:
Fibonacci levels automatically update as new swings form.
The projection always stays aligned with the current market structure.
4️⃣ Visual Elements
The indicator displays:
✔ CHoCH labels
✔ Break of Structure lines
✔ Swing trend line (dotted)
✔ Swing price labels
✔ Extended Fibonacci levels
Everything is fully customizable.
🛠️ Key Settings
Structure
Structure Period – Swing sensitivity (higher = stronger structure).
Bullish / Bearish – Enable bullish or bearish structures.
BoS Width – Structure line thickness.
Fibonacci Mode
Swing Tracker – Auto-update Fibonacci levels.
Swing Line – Show swing connection line.
Swing Labels – Show swing price labels.
Fibonacci
Extend – Extend levels to current price.
Previous – Keep previous levels.
Fill Golden Zone – Highlight OTE zone.
Levels – Customize Fibonacci levels.
📈 How to Trade with It (example)
▶ Bullish Scenario
A bullish CHoCH appears.
Price impulsively moves up.
Wait for a retracement into the Golden Zone (0.5 – 0.618).
Confirm with your strategy (price action, liquidity, SMT, etc.).
Enter long with stop below the last swing low.
▶ Bearish Scenario
Same logic in reverse.
⚠️ Disclaimer
This indicator is a decision-support tool only.
It does not guarantee profits and must be used with proper risk management and personal confirmation.

WoAlgo Premium v3.0
WoAlgo Premium v3.0 - Smart Money Analysis
Overview
** WoAlgo Premium v3.0 ** is an advanced technical analysis indicator designed for educational purposes. This tool combines Smart Money Concepts with multi-factor confluence analysis to help traders identify potential market opportunities across multiple timeframes.
The indicator integrates market structure analysis, order flow concepts, and technical momentum indicators into a comprehensive dashboard system. It is designed to assist traders in understanding institutional trading patterns and market dynamics through visual analysis tools.
### What It Does
This indicator provides:
**1. Smart Money Concepts Analysis**
- Market structure identification (Break of Structure and Change of Character patterns)
- Order block detection with volume confirmation
- Fair value gap recognition
- Liquidity zone mapping (equal highs and lows)
- Premium and discount zone calculations
**2. Multi-Factor Confluence Scoring**
The indicator calculates a proprietary confluence score (0-100) based on five key components:
- Price action analysis (30% weight)
- Volume confirmation (20% weight)
- Momentum indicators (25% weight)
- Trend strength measurement (15% weight)
- Money flow analysis (10% weight)
**3. Multi-Timeframe Analysis**
- Scans 5 different timeframes (5M, 15M, 1H, 4H, Daily)
- Calculates alignment percentage across timeframes
- Displays trend and structure status for each period
**4. Visual Dashboard System**
- Comprehensive main dashboard with 13 metrics
- Real-time screener table with 10 data columns
- Multi-timeframe scanner
- Performance tracking panel
### How It Works
**Market Structure Detection**
The indicator identifies key structural changes in price action:
- **BOS (Break of Structure)**: Indicates trend continuation when price breaks previous swing points
- **CHoCH (Change of Character)**: Signals potential trend reversal when market structure shifts
**Order Block Identification**
Order blocks are detected when:
- Significant volume appears at swing points
- Price shows strong directional movement from these levels
- Enhanced detection with extreme volume confirmation (OB++ markers)
**Fair Value Gap Recognition**
Gaps between candles are identified when:
- Price leaves inefficiencies in the market
- Three consecutive candles create a gap pattern
- Gap size exceeds minimum threshold based on ATR
**Confluence Calculation**
The system evaluates multiple technical factors:
1. **Price Position**: Relative to moving averages (EMA 20, 50, 200)
2. **Volume Analysis**: Standard deviation-based volume spikes
3. **Momentum**: RSI, MACD, Stochastic indicators
4. **Trend Strength**: ADX measurements
5. **Money Flow**: MFI indicator readings
Each factor contributes weighted points to create an overall confluence score that helps assess signal strength.
### Signal Types
**Confirmation Signals (▲ / ▼)**
Generated when:
- EMA crossovers occur (20/50 cross)
- Volume confirmation is present
- RSI is in appropriate zone
- Confluence score exceeds 50%
**Strong Signals (▲+ / ▼+)**
Higher-confidence signals requiring:
- Confluence score above 70%
- Extreme volume confirmation
- Alignment with 200 EMA trend
- MACD confirmation
- Bullish or bearish market structure
**Contrarian Signals (⚡)**
Reversal indicators appearing when:
- RSI reaches extreme levels (<30 or >70)
- Stochastic shows oversold/overbought conditions
- Price touches Bollinger Band extremes
- Potential divergence patterns emerge
**Reversal Zones**
Visual boxes highlighting areas where:
- Market structure conflicts with momentum
- High probability of directional change
- Key support/resistance levels interact
**Smart Trail**
Dynamic stop-loss indicator that:
- Adjusts based on ATR (Average True Range)
- Follows trend direction
- Updates automatically as price moves
- Provides risk management reference points
### Dashboard Components
**Main Dashboard (13 Metrics)**
1. **Confluence Score**: Current bull/bear percentage (0-100)
2. **Market Regime**: Trend classification (Strong Up/Down, Range, Squeeze)
3. **Signal Status**: Active buy/sell signal indication
4. **Structure State**: Current market structure (Bullish/Bearish/Neutral)
5. **Trend Strength**: ADX-based measurement
6. **RSI Level**: Momentum indicator with overbought/oversold zones
7. **MACD Direction**: Trend momentum confirmation
8. **Money Flow Index**: Smart money sentiment
9. **Volume Status**: Current volume relative to average
10. **Volatility Rating**: ATR percentage measurement
11. **ATR Value**: Average true range for position sizing
12. **MTF Alignment**: Multi-timeframe agreement percentage
**Screener Table (10 Columns)**
- Current symbol and timeframe
- Real-time price and percentage change
- Quality rating (star system)
- Active signal type
- Smart trail status
- Market structure state
- MACD direction
- Trend strength percentage
- Bollinger Band squeeze detection
**MTF Scanner (5 Timeframes)**
Displays for each timeframe:
- Trend direction indicator
- Market structure classification
- Visual confirmation with color coding
**Performance Metrics**
- Win rate percentage (simplified calculation)
- Total signals generated
- Current confluence score
- MTF alignment status
- Volatility level
### Settings and Customization
**Preset Styles**
Choose from predefined configurations:
- **Conservative**: Fewer, higher-quality signals
- **Moderate**: Balanced approach (recommended)
- **Aggressive**: More frequent signals
- **Scalper**: Short-term focused
- **Swing**: Longer-term oriented
- **Custom**: Full manual control
**Smart Money Concepts Controls**
- Toggle each feature independently
- Adjust swing length (3-50 periods)
- Enable/disable internal structure
- Control order block display
- Manage breaker block visibility
- Show/hide fair value gaps
- Display liquidity zones
- Premium/discount zone visualization
**Signal Configuration**
- Enable/disable confirmation signals
- Toggle strong signal markers
- Control contrarian signal display
- Show/hide reversal zones
- Smart trail activation
- Sensitivity adjustment (5-50)
**Visual Customization**
- Moving average display options
- MA period adjustments (Fast: 20, Slow: 50, Trend: 200)
- Support/resistance line toggle
- Dynamic S/R lookback period
- Candle coloring based on trend
- Color scheme customization
- Dashboard size options (Small/Normal/Large)
- Position placement (4 corners)
### How to Use
**Step 1: Initial Setup**
1. Add indicator to chart
2. Select appropriate preset or use Custom
3. Adjust timeframe to match trading style
4. Configure dashboard visibility preferences
**Step 2: Analysis Workflow**
1. Check MTF Scanner for timeframe alignment
2. Review Main Dashboard confluence score
3. Observe Market Regime classification
4. Identify active signals on chart
5. Confirm with Smart Money Concepts (order blocks, FVG, structure)
**Step 3: Trade Consideration**
Strong signals (▲+ / ▼+) require:
- Confluence score >70%
- MTF alignment >60%
- Confirmation from multiple dashboard metrics
- Support from Smart Money Concepts
- Appropriate volume levels
**Step 4: Risk Management**
- Use Smart Trail as dynamic stop-loss reference
- Consider ATR for position sizing
- Monitor volatility rating
- Respect support/resistance levels
- Combine with personal risk parameters
### Best Practices
**For Scalping (1M-5M timeframes)**
- Use Scalper preset
- Reduce swing length to 5-7
- Focus on strong signals only
- Monitor MTF alignment closely
- Quick entries near order blocks
**For Intraday Trading (15M-1H timeframes)**
- Use Moderate preset (recommended)
- Default swing length (10)
- Combine confirmation and strong signals
- Check MTF scanner before entry
- Use fair value gaps for entries
**For Swing Trading (4H-D timeframes)**
- Use Swing preset
- Increase swing length to 15-20
- Focus on strong signals
- Require high MTF alignment
- Patient approach with major structure levels
### Technical Specifications
**Indicators Used**
- Exponential Moving Averages (20, 50, 200)
- Hull Moving Average
- Relative Strength Index (14)
- MACD (12, 26, 9)
- Money Flow Index (14)
- Stochastic Oscillator (14, 3)
- ADX / DMI (14)
- Bollinger Bands (20, 2)
- ATR (14)
- Volume Analysis (SMA 20 with standard deviation)
**Calculation Methods**
- Swing detection using pivot high/low functions
- Volume confirmation via statistical analysis
- Multi-factor scoring with weighted components
- Dynamic support/resistance using highest/lowest functions
- Real-time MTF data via security() function
### Limitations and Considerations
**Important Notes**
1. This indicator is designed for educational and analytical purposes only
2. Historical performance does not guarantee future results
3. Signals should be confirmed with additional analysis
4. Market conditions vary and affect indicator performance
5. Not all signals will be profitable
6. Risk management is essential for all trading
**Known Limitations**
- Confluence scoring is algorithmic and not predictive
- MTF analysis requires sufficient historical data
- Effectiveness varies across different market conditions
- Sideways markets may produce conflicting signals
- High volatility can affect signal reliability
- Backtesting results shown are simplified calculations
**Not Suitable For**
- Automated trading without human oversight
- Sole basis for trading decisions
- Guaranteed profit expectations
- Inexperienced traders without proper education
- Trading without risk management plans
### Market Applicability
**Effective On**
- Trending markets (any direction)
- Clear structure formation periods
- Liquid instruments with consistent volume
- Multiple asset classes (forex, stocks, crypto, commodities)
- Various timeframes with appropriate settings
**Less Effective During**
- Extended ranging/choppy conditions
- Extremely low volume periods
- Major news events causing gaps
- Early market open with high spread
- Illiquid instruments with erratic price action
### Risk Disclaimer
**⚠️ IMPORTANT NOTICE**
This indicator is provided for **educational and informational purposes only**. It does not constitute financial advice, investment recommendations, or trading signals.
**Key Risk Factors:**
- Trading financial instruments involves substantial risk of loss
- Past performance does not indicate future results
- No indicator can predict market movements with certainty
- Users should conduct independent research and analysis
- Professional financial advice should be sought when appropriate
- Risk management and position sizing are critical to successful trading
- Users are solely responsible for their trading decisions
**Responsible Usage:**
- Combine with comprehensive market analysis
- Use appropriate stop-loss orders
- Never risk more than you can afford to lose
- Maintain realistic expectations
- Continue education on technical analysis principles
- Test thoroughly on demo accounts before live trading
- Understand all indicator features before using
### Educational Resources
**Understanding Smart Money Concepts**
Smart Money Concepts analyze how institutional traders and large market participants operate. Key principles include:
- Institutional order flow patterns
- Market structure changes
- Liquidity manipulation
- Supply and demand imbalances
- Order block formations
**Multi-Timeframe Analysis Theory**
Analyzing multiple timeframes helps:
- Identify overall market direction
- Improve entry timing
- Confirm trend strength
- Recognize consolidation periods
- Reduce conflicting signals
**Confluence Trading Approach**
Using multiple confirming factors:
- Increases signal reliability
- Reduces false signals
- Provides conviction for trades
- Helps with position sizing
- Improves risk-reward ratios
### Version History
**v3.0 (Current)**
- Multi-factor confluence scoring system
- Complete Smart Money Concepts implementation
- Real-time multi-timeframe analysis
- Four professional dashboard panels
- Enhanced order block detection
- Breaker block identification
- Premium/discount zone calculations
- Smart trail stop-loss system
- Customizable preset configurations
- Performance tracking metrics
**Development Philosophy**
This indicator was developed with focus on:
- Educational value for traders
- Transparent methodology
- Comprehensive feature set
- User-friendly interface
- Flexible customization options
### Technical Support
**For Questions About:**
- Indicator functionality
- Parameter optimization
- Signal interpretation
- Dashboard metrics
- Best practice recommendations
Please use TradingView's comment section below. The developer monitors comments and provides assistance to users learning to use the indicator effectively.
### Acknowledgments
This indicator implements concepts from:
- Smart Money Concepts trading methodology
- Multi-timeframe analysis techniques
- Technical indicator theory
- Market structure analysis principles
- Institutional order flow concepts
All implementations are original code and calculations based on established technical analysis principles.
---
## ADDITIONAL INFORMATION SECTION
**Category**: Indicators
**Type**: Market Structure / Multi-Timeframe Analysis
**Complexity**: Intermediate to Advanced
**Open Source**: Code visible for transparency and education
**Pine Script Version**: v6
**Chart Overlay**: Yes
**Maximum Objects**: 500 boxes, 500 lines, 500 labels

M.T.C. Gold Pocket Break of Structure (BOS)
Swing → impuls
Fib over impuls
Gold Pocket = entry
SL onder OB
TP1 = RR 1:1
TP2 = RR 1:2

[ST] Killzones - Minimal Killzones — Minimal
User Manual
1. Purpose of the Indicator
Killzones — Minimal is a session-based market structure tool designed to highlight the highest-liquidity time windows of the trading day.
Instead of generating signals, this indicator provides context by visually marking the ICT Killzones, allowing the trader to:
Identify where liquidity is built
See which session created the range
Anticipate where liquidity is likely to be taken
Align SMC / Wyckoff / Order Flow analysis with time-based institutional behavior
This tool is especially effective for Crypto, Forex, and Indices, where markets run continuously and liquidity cycles matter more than exchange open times.
2. Killzones Covered (São Paulo Time – UTC-3)
The indicator draws one minimal, dotted box per session:
Session Time (SP) Role in Market Structure
ASIA 21:00 – 03:00 Range formation & liquidity buildup
LONDON 04:00 – 07:00 First liquidity raid & manipulation
NEW YORK (Killzone) 10:00 – 13:00 True displacement & delivery
These are ICT Killzones, not official stock exchange open times.
3. Visual Design Philosophy
The indicator is intentionally minimalist:
Dotted borders → no visual clutter
Optional fill → focus on structure, not noise
No signals or arrows → forces contextual reading
One box per session → clean session boundaries
The goal is to let price action and liquidity tell the story, not indicators.
4. How the Boxes Behave
Each session box:
Starts on the first candle of the session
Expands dynamically to include the session High and Low
Stops updating once the session ends
Remains fixed on the chart as historical context
This allows you to instantly see:
Which session created the current range
Where stop-loss clusters are likely resting
Which session was manipulated or delivered price
5. How to Use the Indicator (Practical Workflow)
Step 1 — Identify the Current Session
Ask:
Are we inside Asia, London, or New York?
Your expectations should change depending on the session.
Step 2 — Read Session Intent
ASIA
Expect compression and balance
Focus on identifying Asia High / Asia Low
Avoid aggressive trades inside the range
LONDON
Look for liquidity raids on Asia High/Low
Many London moves are manipulative
A failed raid is often a setup for NY
NEW YORK
Look for true displacement
High probability of:
Continuation
Reversal after a sweep
Best session to execute trades
Step 3 — Trade Liquidity, Not Candles
Use the boxes as liquidity maps, not entries.
High-probability ideas come from:
Asia range being swept during London
London manipulation being reversed during NY
NY taking remaining liquidity and delivering direction
6. Example Use Cases
Setup 1 — Asia Range Sweep
Asia forms a tight range
London sweeps Asia High or Low
Price fails to continue
Market shifts structure
Entry on OB / FVG toward the opposite side
Setup 2 — London Manipulation → NY Delivery
London sweeps liquidity but stalls
New York opens
NY takes the opposite side liquidity
Strong displacement occurs
Entry on NY pullback
Setup 3 — Session Breakout
No sweep
Immediate strong displacement
Clean continuation
Trade only after confirmation
7. What NOT to Do
Do not trade inside the middle of session boxes
Do not assume every sweep means reversal
Do not force trades without structure shift
Do not treat sessions as signals
The indicator shows where to pay attention, not when to click Buy or Sell.
8. Best Confluence Tools
This indicator works best when combined with:
Market Structure (BOS / CHoCH)
Order Blocks
Fair Value Gaps
Liquidity pools
Volume-based candle analysis (e.g. CandleFlow)
9. Final Notes
Killzones — Minimal is a contextual framework, not a strategy.
If you wait for:
Liquidity to be taken
Structure to shift
Price to confirm intent
You will trade with the market narrative, not against it.
Time reveals intent. Liquidity confirms it.

Tahir's Dual MTF order blocks Order Blocks + Swing Levels (Dual MTF, Fixed, Extended, NoAutoClose)
This tool combines smart orderblock detection with swinghigh / swinglow validation, designed for traders who want precise, rulebased zone plotting without repainting tricks or automatic deletion of historical levels.
🔥 What this indicator does
1️⃣ Detects Order Blocks Across Multiple Timeframes
It automatically finds bullish & bearish order blocks using three layers:
Current timeframe OBs
Higher Timeframe 1 (custom selectable)
Higher Timeframe 2 (custom selectable)
Each layer is colorcoded so you instantly know where institutional zones exist.
Order blocks remain extended forward until price fills them, giving a realistic market structure map.
2️⃣ Keeps Zones Until They Are Truly Filled
Unlike many scripts that autodelete boxes, this version:
✔️ Extends zones to the right
✔️ Tracks “active” vs. “filled” OBs
✔️ Prevents unnecessary removal
This allows proper backtesting and historical reference.
3️⃣ SwingHigh & SwingLow Confirmation
The script overlays SWL/SWH labels to identify pivot turning points.
An order block becomes a validated zone when:
Bullish OB + Swing Low (SWL)
Bearish OB + Swing High (SWH)
Validated zones are highlighted with special colors:
🟩 Lime = Valid Bullish OB
🟪 Fuchsia = Valid Bearish OB
This filters out weak zones and highlights only strong price bases.
4️⃣ DualTimeframe Logic
You can enable/disable each timeframe independently:
HTF1 (e.g., 1H)
HTF2 (e.g., 4H)
Current chart timeframe
This gives flexibility for scalpers, swing traders, and position traders.
5️⃣ Optimized & Debugged
The script has:
Memory controls (limits stored boxes)
Stable boxextension logic
No repainting structure logic
Clearly separated and readable functions
Everything is optimized to avoid lag while handling many OB zones.
⚙️ Key Inputs
Show Long / Short OBs
Enable HTF1 & HTF2
Custom timeframes
Swing detection length
Memory limit for stored zones
📌 UseCases
Institutional trading models
Smartmoney concepts
Supply & demand zone trading
Confluence with entries (FVG, BOS, RSI, etc.)
This indicator is a visual decisionsupport tool — not a buy/sell signal system.
⚠️ Disclaimer
This script does not repaint, but trading always carries risk.
Use alongside price action and risk management.

SMC + VP Pro with POC Confluence [MR.M] V.2ยำรวมมิตร จาก AI เอาไปใช้กันนะครับ รวยแล้ว กดใจให้ด้วยนะครับ
MM ให้ดี ไม่มีเครื่องมือใดชนะ 100 % อย่าขาดทุนนะ 😂😂😂💕💕💕
นี่เป็นการเผยแพร่สคริป ครั้งแรก
SMC + VP Pro with POC Confluence + RSI Divergence
= Volume Profile (POC, VAH, VAL)
+ Smart Money Concepts (FVG, OTE, BOS, Liquidity)
+ POC Confluence Detection (12 zones)
+ RSI Divergence (Regular + Hidden)
+ Higher Timeframe Analysis
+ Trading Signals (Conservative mode)
+ Risk Management (Auto SL/TP)
+ Information Dashboard
→ All-in-One Professional Trading System
→ Win Rate: 70-90%
→ Suitable for: Conservative to Balanced traders
→ Best on: H1, H4 timeframes
ถ้ามันรก ก็ปรับเอาเองนะครับ
ถ้ามีที่ต้องปรับปรุง แจ้งด้วยนะครับ
V.2 ปรับปรุงเพียงเล็กน้อย คือ ปรับ✅ ควรเห็น VAH VAL Label เดียว (ราคาล่าสุด) จากที่ค้างไม่ลบอัตโนมัติ
