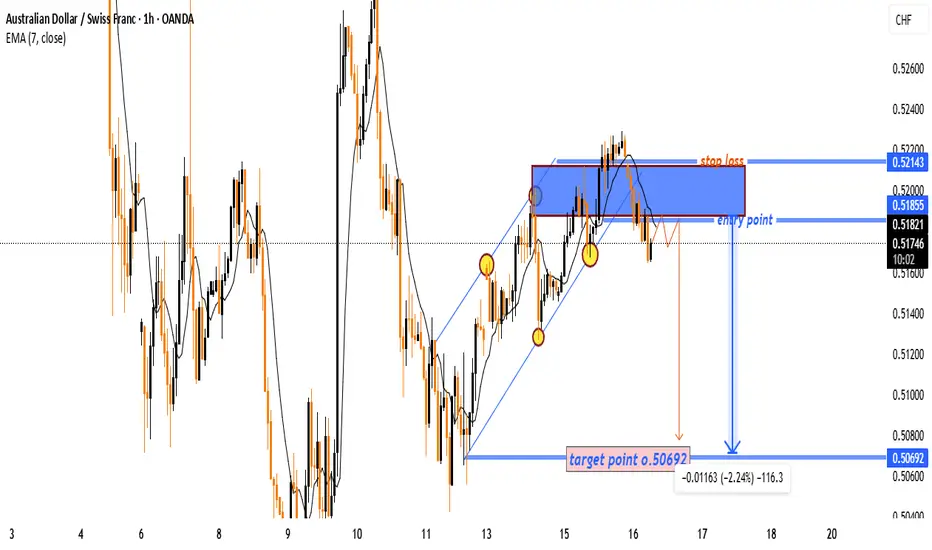
AUD/CHF Bullish Breakout Setup – Demand Zone to Target 0.546001. Setup Overview
📈 Trade Type: Long (Buy)
📊 Chart Pattern: Trendline Breakout
📏 Indicator Used: EMA (70) — 🔴 0.53726
2. Key Price Levels
🔵 Demand Zone:
* 0.53225 – 0.53504
* Strong buying interest seen here
⬆️ Entry Point:
* Around 0.53517 – 0.53630
* Price is breaking above resistance and trendline
🛑 Stop Loss:
* Below 0.53219
* Protects against false breakout
🎯 Target Point:
* Primary TP: 0.54600
* Extended TP: 0.54697
* Previous supply/resistance zone
3. Structure Breakdown
📉 Trendline:
* Downward sloping trendline has been tested
* Price looks to be breaking out
📌 Resistance Turned Support:
* Break above 0.53500 confirms bullish momentum
📊 EMA (70):
* Current price is slightly below EMA
* Bullish confirmation if price closes above it
4. Risk-to-Reward
⚖️ R:R Ratio: Approximately 1:3
* Small stop loss for a much larger upside
Audchfidea
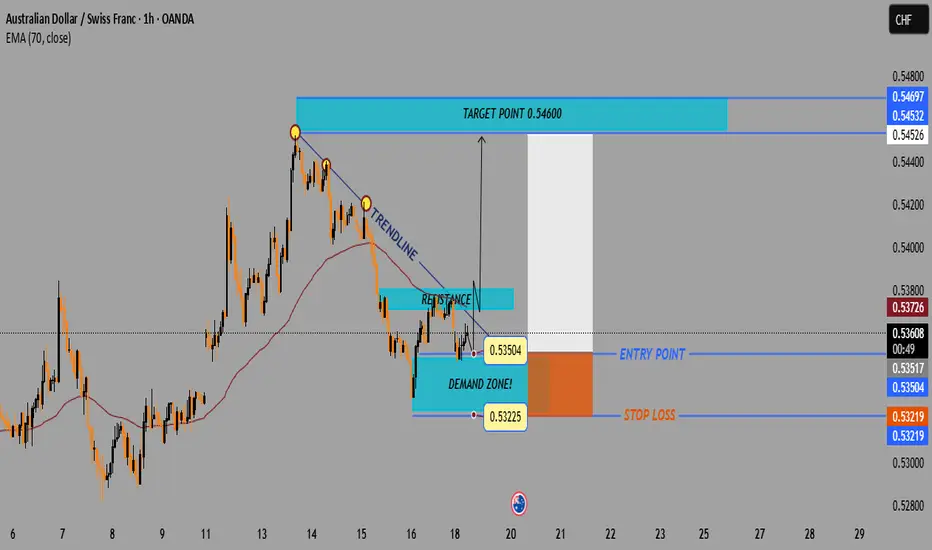
AUD/CHF Bearish Breakout &Retest Setup High Reward Short OprtntyChart Analysis – AUD/CHF (1H)
1. Trend Structure
🔼 Uptrend Channel (before the drop)
* Price was making higher highs and higher lows
* Buyers were in control temporarily
🔽 Bearish Breakout
* Price broke below the channel support
* First sign of weakness from bulls
* EMA (7) crossed and sloped downward – trend shift confirmed.
2. Key Levels
🔵 Entry Point: 0.51855
🟠 Stop Loss: 0.52143
🟢 Target Point: 0.50692
3. Trade Plan
✍️ Setup: Break & Retest Short
🔁 Price came back to retest broken structure (resistance zone – blue box)
❌ Rejection at resistance = confirmation to go short.
4. Emoji-Dot Summary of Strategy
🔵 ● Entry at 0.51855 → After retest of the broken trend
🟥 ● Stop Loss at 0.52143 → Above recent highs (safe buffer)
✅ ● Target at 0.50692 → Next su…