AUDNZD BuyFOREXCOM:AUDNZD
Hello traders , here is the full multi time frame analysis for this pair, let me know in the comment section below if you have any questions, the entry will be taken only if all rules of the strategies will be satisfied. wait for more Smart Money to develop before taking any position . I suggest you keep this pair on your watchlist and see if the rules of your strategy are satisfied...
Keep trading
Hustle hard
Audnzdlong

AUDNZDFX:AUDNZD
As you can see that, AUDNZD in 1Hr Time frame has formed a Lower low Trend line pattern and a good support level. if it gives rejection at drawn support level and breakout at drawn trend line we can plan for buy side. This is for monday (07-08-2023) Plan your trade accordingly...

AUD/USD On Major Suppport - BUY TrendHello traders! Today, I am sharing a strong trade idea for AUDUSD that could potentially result in profits. The gold price has been showing a bullish momentum, making higher highs and higher lows (HL) on the daily chart, indicating a potential uptrend.
For the Entry, Take Profit and Stoploss refer to chart.
As always, it is important to consider risk management strategies and remain vigilant, as unexpected events and news could impact the markets.
In conclusion, I believe that buying AUDUSD using the higher highs and HL analysis could be a profitable trade idea. Thank you for following my trade idea, and I wish you all the best in your trading journey. Happy Trading!
Disclaimer: This trade idea is for educational and informational purposes only. Trading in the financial markets involves risk, and past performance is not necessarily indicative of future results. Before placing any trades, you should carefully consider your financial situation, risk tolerance, and trading experience. Please be aware that trading in the foreign exchange market, particularly with leveraged instruments such as CFDs, involves significant risks and may not be suitable for all investors. The author shall not be liable for any losses incurred as a result of using this trade idea. Traders should always trade at their own risk and responsibility.

Possible long AUD/NZD setupAUD/NZD at the support level. Looking for a bounce here from these levels.

Long AUD/NZD from a support The pair has started a new uptrend and has stayed above the ichimoku cloud for a decent amount of time. It is now at a support level both from the point of view of the ichimoku clouds and also the standard pivot level. It also seems to be forming a flag pattern on the hourly timeframe which further adds conviction to the long idea. The target will easily be a new high in the this wave of the rally.

AUDNZDthis chart show neutral dissection because market move up or down, both are possible. so if you use your won price action and find entry , after entry follow proper money management rules and trading rules. don't forget your trading plan. before entry find stop loss and target AUDNZD 3 hours chart analysis, double top pattern. trading strategy, forex trading

AUDNZD BuyFX:AUDNZD
AUDNZD ( 1HR Time frame ) has created a double bottom and it has given Neckline breakout and it retesting the neckline level, Now we can plan for buying side. plan your trade accordingly....

AUDNZD BuyFX:AUDNZD
As we can see that AUDNZD has created a Down trend channel pattern and breakout also happened at buy side, if it gives pull back entry we can plan our trade for buy side. plan your trade accordingly....

AUDNZD short term buy/Forming a reversal patternHi All,
Looking at chart for the pair, we can anticipate the sell trend is coming to an end. The month support holds good, Bullish candle in 4hr with good volume. We can see the price is now forming an inverse H&S(trend reversal pattern), where we are buying the head.
The plan is to look for only buy in this pair.
Entry , Sl and TP marked.
Thank you

AUDNZD AnalysisSetup Contains:
1. Equal Lows Liquidity Raid
2. Bullish Structural Break
3. Mitigation of Orderblock
4. LTF Refinement
FOLLOW PAFX & TRADE LIKE BANKS 💸

audnzd next possible move with elliott wave and demand supplyaudnzd next possible move with elliott wave and demand supply
audnzd next possible move with elliott wave and demand supply
audnzd next possible move with elliott wave and demand supply

AUDNZD AnalysisSetup Contains:
1. Stop Hunt (Sell Side Liquidity)
2. Break of Structure
3. Returned To Orderblock +71% Fib Level
FOLLOW PAFX & TRADE LIKE BANKS 💸

AUDNZD Analysis UpdateWe forecasted and shared our view of AUDNZD!! The analysis turned out as we wanted and the entry was a SNIPER ENTRY as well 🎯
From this Setup we got:
38+ PIPS, 1:3+ Risk to Reward Ratio!

💡Don't miss the great buy opportunity in AUDNZDTrading suggestion:
". There is a possibility of temporary retracement to the suggested support line (1.1006).
. if so, traders can set orders based on Price Action and expect to reach short-term targets."
Technical analysis:
. AUDNZD is in an uptrend, and the continuation of the uptrend is expected.
. The price is above the 21-Day WEMA, which acts as a dynamic support.
. The RSI is at 48.
Take Profits:
TP1= @ 1.1076
TP2= @ 1.1110
TP3= @ 1.1148
TP4= @ 1.1194
TP5= @ 1.1234
SL= Break below S2
❤️ If you find this helpful and want more FREE forecasts in TradingView
. . . . . Please show your support back,
. . . . . . . . Hit the 👍 LIKE button,
. . . . . . . . . . Drop some feedback below in the comment!
❤️ Your support is very much 🙏 appreciated!❤️
💎 Want us to help you become a better Forex / Crypto trader?
Now, It's your turn!
Be sure to leave a comment; let us know how you see this opportunity and forecast.
Trade well, ❤️
ForecastCity English Support Team ❤️

DEMAND ZONE-BUY AUDNZD in monthly demand zone .take further analysis take entry after the trend reversal or else enter with trail stoploos bcoz monthly demad zone in the major support .It is in channel pattern for the past few years .jusy my view


AUDNZD HEAD AND SHOULDER PATTERN 1 HOURAUDNZD , Head and shoulder pattern formed...Waiting for a retest and then GO SHORT.


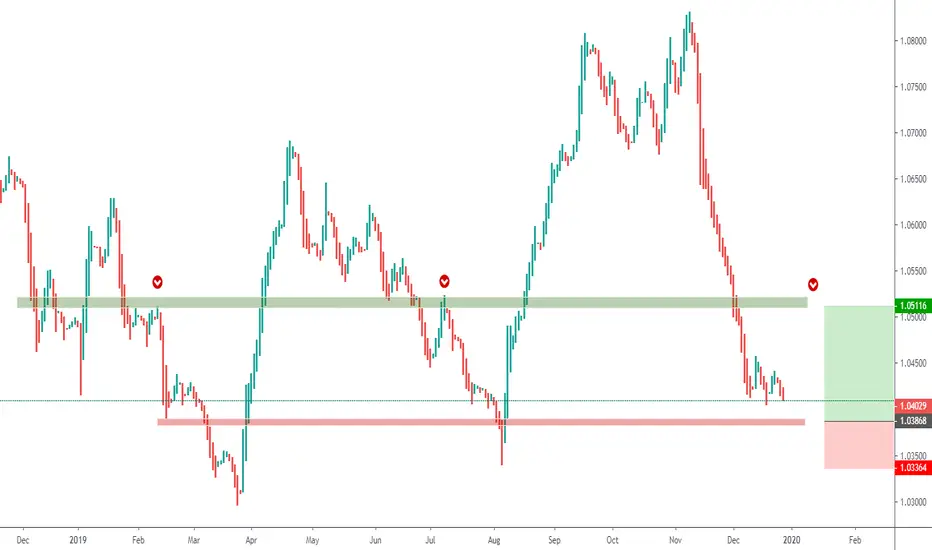
AUDNZD SHORT TERM BUYAUDNZD
The pair trading in a bearish market since November last week.and erase most of the gains.
Now its trading at major resistance level at 78.6% Fibonacci
From the 1.03900 level we can open buy orders and Potential take profit will be 1.05100
Stop lose may be placed at 1.03360 level
NZDUSD - Bullish Divergence As indicated on CCI a bullish divergence is seen on NZDUSD pair on the daily chart. We can buy this as per the indicated limits.
