BBTC - Strong Bullish Momentum Breakout
💹 Bombay Burmah Trading Corp. Ltd (NSE: BBTC)
Sector: Diversified Holdings | CMP: 2022.70 | View: Strong Bullish Momentum Breakout
Chart Pattern: Falling Channel Breakout
Candlestick Pattern: Three Inside Up
Swing High: 2074
Swing Low: 1740
STWP Trade Analysis:
Breakout Entry: 2048
Stop Loss: 1816
Momentum: Very Strong
Volume: Exceptional institutional surge
The candle shows dominance from bulls with a surge above recent range, supported by fresh volume expansion and a clear shift in trend behaviour.
Resistances:
2099.47 | 2176.23 | 2304.47
Supports:
1894.47 | 1766.23 | 1689.47
STWP Stock Analysis:
Final Outlook:
Momentum: Strong | Trend: Bullish Developing | Risk: Moderate | Volume: Very High
BBTC has delivered a high-conviction breakout, with an explosive volume spike that clearly signals institutional participation. The strong bullish candle has invalidated prior downside pressure and pushed the stock above its short-term resistance band. The price action has reclaimed short-term averages and is moving away from the lower accumulation zone, supported by RSI stabilizing near the balanced zone, MACD attempting a recovery crossover, and Stochastic signalling early momentum buildup.
The VCP dashboard shows no active contractions but confirms volume dry-up previously, suggesting that the breakout candle represents the first expansion leg after consolidation. Volume today is unusually high, indicating ignition strength and potential start of a trend reversal from the recent downtrend.
Multiple confluences — 52-week volume breakout, EMA compression easing, Bullish Supertrend trigger, RSI rebound, and strong volume footprint — reinforce the improving momentum structure. Sustaining above 1894–1900 keeps the bullish bias intact and opens the path toward upper resistance zones at 2099 → 2176 → 2304.
Overall, BBTC now stands in a bullish reversal phase, driven by strong volume, improving indicators, and a clean breakout structure that favours continuation if the stock holds above its demand supports.
⚠️ Disclosure & Disclaimer – Please Read Carefully
The information shared here is purely for learning and educational purposes. It is not investment advice or a recommendation.
I am not a SEBI-registered advisor. All observations are based on charts, technical structures, and publicly available data.
Market trading involves significant risk. Please consult a SEBI-registered financial advisor before acting on any idea.
Position Status: No active position in BBTC at the time of analysis.
Data Source: TradingView & NSE India (Past Chart Reference).
💬 Found this useful?
🔼 Boost this post to support structured learning
✍️ Drop your thoughts or questions in the comments
🔁 Share with traders who benefit from clean technical studies
👉 Follow for disciplined, structured, STWP-style analysis.
🚀 Stay Calm. Stay Clean. Trade With Patience.
Trade Smart | Learn Zones | Be Self-Reliant 📊
STWP

SIEMENS: High-Volume Bullish Reversal Breakout________________________________________
💹 Siemens Ltd (NSE: SIEMENS)
Sector: Capital Goods | CMP: 3232.60 | View: High-Volume Bullish Reversal Breakout
Chart Pattern: Falling Wedge
Candlestick Pattern: Bullish Marubozu
Swing High: 3368
Swing Low: 2925
________________________________________
HNI Trade Analysis:
Bullish Breakout Zone: 3232.6 - 3242
Stop Loss: 3094.44
Low-Risk Entry Zone: 3205
Stop Loss: 3051.17
A decisive wide-range bullish candle with extremely high volume signals aggressive institutional accumulation. Price has broken above the recent micro-range, validating the bullish retracement reversal.
________________________________________
STWP Trade Analysis:
Breakout Level: 3242
Stop Loss: 3094.44
Structure: Strong Bullish Candle + High Volume + Reversal Confirmation
Note: Multi-day compression has triggered a high-probability expansion phase.
________________________________________
Resistances: 3285.27 | 3337.93 | 3433.87
Supports: 3136.67 | 3040.73 | 2988.07
________________________________________
STWP Stock Analysis (Brief Synopsis):
Siemens has delivered a powerful bullish reversal breakout after weeks of consolidation and downward drift, confirmed by a strong Marubozu candle supported by 1.56M volume, significantly above the average. Price has cleanly broken above its short-term declining trendline, reclaiming key levels with strong momentum. RSI has moved into a balanced-to-bullish zone near 62, MACD has triggered a fresh bullish crossover, and Stochastic signals sustained buyer strength.
The breakout also aligns with a Bollinger Band expansion, indicating volatility release from a low-compression phase. Multiple bullish triggers are present simultaneously — RSI breakout, EMA compression to expansion shift, ADX improvement, and volume surge — all hinting that institutional activity is backing the move.
Fibonacci retracement zones remain supportive, with price reclaiming the 23.6% (3029) and 38.2% (3094) levels and heading toward 61.8% (3198) and 78.6% (3273), which aligns with the current price zone.
Trend-wise, intraday timeframes (5m–1H) are fully bullish, while the daily timeframe has turned upward after a prolonged downtrend. The weekly remains corrective but improving. As long as Siemens sustains above 3136–3040, the bullish continuation bias stays intact.
Overall, Siemens now reflects a strong reversal breakout, backed by unusually high volume, renewed momentum, and multi-indicator convergence, favouring continuation toward upper resistance bands.
________________________________________
Final Outlook:
Momentum: Strong
Trend: Bullish (Short-Term) | Improving (Medium-Term)
Risk: Low
Volume: Very High (Institutional Footprints)
________________________________________
⚠️ Disclosure & Disclaimer – Please Read Carefully
The information shared here is exclusively for learning and educational purposes. This is not investment advice and should not be considered a buy or sell recommendation.
I am not a SEBI-registered investment adviser. All views are based purely on chart analysis and publicly available market data.
Financial markets involve risk, and traders must assess their own risk tolerance before taking any trade. Please consult a SEBI-registered financial adviser for investment decisions.
________________________________________
Position Status: No active position in (SIEMENS) at the time of analysis.
Data Source: TradingView & NSE India (Past Chart Reference).
________________________________________
💬 Found this useful?
🔼 Boost this post to help more traders learn structured price-action analysis.
✍️ Share your views or setups in the comments — let’s grow as disciplined traders.
🔁 Forward this to fellow learners who want clean technical frameworks.
👉 Follow for more high-quality, structured STWP breakdowns.
________________________________________
🚀 Stay Calm. Stay Clean. Trade With Patience.
Trade Smart | Learn Zones | Be Self-Reliant 📊
________________________________________

HEROMOTOCO - Strong Bullish Momentum Breakout💹 Hero Motocorp Ltd (NSE: HEROMOTOCO)
Sector: Auto | CMP: 5798 | View: Strong Bullish Momentum Breakout
Chart Pattern: Bullish Rectangle Breakout
Candlestick Pattern: Strong Bullish Candle
Swing High: 6246.25
Swing low:3344
HNI Trade Analysis:
Bullish Breakout: 5798.50 - 5810
Stop Loss: 5537.16
Low Risk Level: 5755.13
Stop Loss: 5465.16
STWP Trade Analysis:
Bullish Breakout: 5810
Stop Loss: 5455.95
Strong Momentum with Extremely High Volume
Resistances: 5882|5965.5|6121
Supports: 5643|5487.5|5404
STWP Stock Analysis:
Final Outlook:
Momentum: Strong | Trend: Bullish | Risk: Low | Volume: High
HEROMOTOCO is displaying a powerful continuation of its long-term uptrend, marked by a strong bullish candle and a fresh breakout backed by high institutional activity. The recent structure shows a clear VCP-style contraction, where volatility progressively narrowed before the price expanded sharply — fully validated by the VCP dashboard’s breakout signal. Price has surged with a wide-range move, reclaiming short- and medium-term EMAs while maintaining higher highs and higher lows since early April. Momentum indicators remain firmly bullish — RSI is in the strong zone, MACD has triggered a fresh upward crossover, and Stochastic shows renewed strength, signalling buyers’ dominance across timeframes. Volume behaviour reinforces the setup, with expanding bars confirming accumulation phases followed by trend expansion. Additional confluences such as Bollinger Band expansion, Bullish Supertrend alignment, and multiple technical triggers (RSI breakout, VMA rejection, Bollinger mid-band strength) further strengthen the bullish bias. Overall, the stock reflects a healthy, institutionally supported uptrend with strong momentum, clear VCP validation, and a technically clean continuation structure that favours upside extensions as long as it sustains above its short-term demand zones.
⚠️ Disclosure & Disclaimer – Please Read Carefully
The information shared here is meant purely for learning and awareness. It is not a buy or sell recommendation and should not be construed as investment advice.
I am not a SEBI-registered investment adviser, and this analysis is based on chart observations, technical patterns, and public data.
Trading involves risk; market movements can be sudden, and losses may exceed invested capital.
Past performance or setups do not guarantee future results.
Please evaluate your risk management and suitability before taking any trading decision.
Consult a SEBI-registered financial adviser before acting on any trade idea.
Position Status: No active position in (HEROMOTOCO) at the time of analysis.
Data Source: TradingView & NSE India (Past Chart Reference).
💬 Found this useful?
🔼 Give this post a Boost to help more traders discover structured learning.
✍️ Drop your thoughts, queries, or setups in the comments — let’s grow together!
🔁 Share this with fellow traders and learners to promote structured analysis.
👉 “If you liked this breakdown, follow for more clean, disciplined setups with patience at the core.”
🚀 Stay Calm. Stay Clean. Trade With Patience.
Trade Smart | Learn Zones | Be Self-Reliant 📊

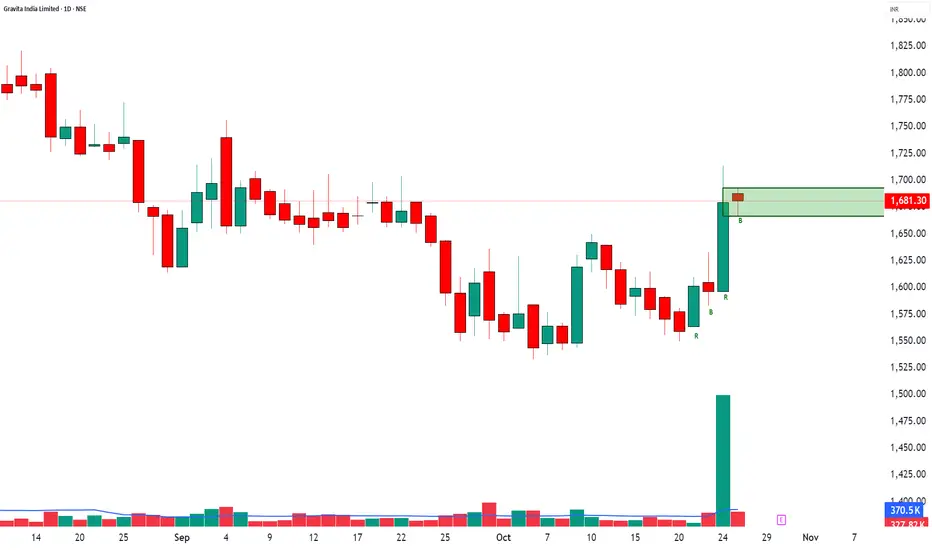
GRAVITA INDIA LTD – Strong Demand Zone📈 GRAVITA INDIA LTD – Strong Demand Zone at 1667–1692 🟢
🔹 Supports: 1668 / 1654 / 1642
🔹 Resistances: 1693 / 1705 / 1718
🔹 Swing Demand Zone: 1692–1667
🎯 STWP Trade View:
Gravita India is currently building strength near its new demand zone.
If the price holds above 1667, it can trigger a move toward 1715–1735 in the short term.
A retest near 1670–1665 with low volume will offer a favorable long entry opportunity.
💡 Learning Note:
Demand zones formed after large bullish candles with high volume often indicate institutional absorption.
Wait for price confirmation or retest to ensure strong continuation from the zone.
Final Outlook: Momentum: Building Up | Trend: Bullish Bias | Risk: Moderate | Volume: Extremely High
________________________________________
________________________________________
⚠️ Disclosure & Disclaimer – Please Read Carefully
The information shared here is meant purely for learning and awareness. It is not a buy or sell recommendation and should not be taken as investment advice. I am not a SEBI-registered investment adviser, and all views expressed are based on personal study, chart patterns, and publicly available market data.
Trading—whether in stocks or options—carries risk. Markets can move unexpectedly, and losses can sometimes exceed the money you have invested. Past performance or past setups do not guarantee future results.
If you are a beginner, treat this as a guide to understand how the market works and practice on paper trades before risking real money. If you are experienced, always assess your own risk, position sizing, and strategy suitability before entering trades.
Consult a SEBI-registered financial adviser before making any real trading decision. By engaging with this content, you acknowledge full responsibility for your trades and investments.
Position Status: No active position in GRAVITA at the time of analysis.
Data Source: TradingView & NSE India (Past Chart Reference) (Historical levels)
💬 Found this useful?
🔼 Give this post a Boost to help more traders discover clean, structured learning.
✍️ Drop your thoughts, questions, or setups in the comments — let’s grow together!
🔁 Share with fellow traders and beginners to spread awareness.
👉 “If you liked this breakdown, follow for more clean, structured setups with discipline at the core.”
🚀 Stay Calm. Stay Clean. Trade With Patience.
Trade Smart | Learn Zones | Be Self-Reliant 📊
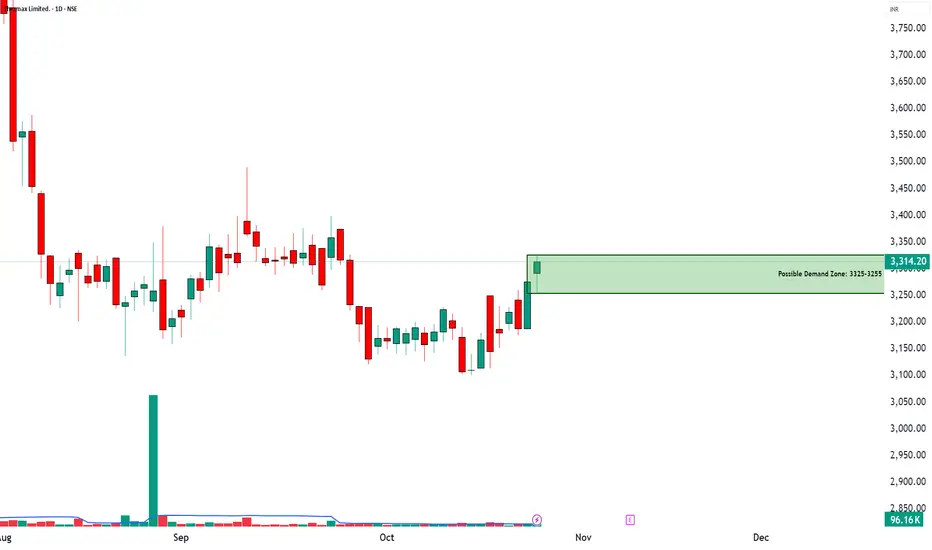
THERMAX LTD – Possible Demand Zone📈 THERMAX LTD – Possible Demand Zone in The Making - A possible Rally Base Rally
🔹 Entry Zone: 3325
🔹 Supports: 3271 / 3228 / 3201
🔹 Resistances: 3341 / 3368 / 3411
🔹 Swing Demand Zone: 3325–3255
🎯 STWP Trade View:
Thermax is showing early signs of trend reversal from recent consolidation.
A sustained close above 3340 may open the way for possible further upside move, while dips toward 3280–3260 can offer buying opportunities.
💡 Learning Note:
When price revisits a previously strong demand zone with low volume and then bounces sharply — it often signals the presence of smart money. Watch how price behaves near zone retests before scaling up.
Final Outlook:
Momentum: Building | Trend: Early Bullish | Risk: Controlled | Volume: picking up
________________________________________
________________________________________
⚠️ Disclosure & Disclaimer – Please Read Carefully
The information shared here is meant purely for learning and awareness. It is not a buy or sell recommendation and should not be taken as investment advice. I am not a SEBI-registered investment adviser, and all views expressed are based on personal study, chart patterns, and publicly available market data.
Trading—whether in stocks or options—carries risk. Markets can move unexpectedly, and losses can sometimes exceed the money you have invested. Past performance or past setups do not guarantee future results.
If you are a beginner, treat this as a guide to understand how the market works and practice on paper trades before risking real money. If you are experienced, always assess your own risk, position sizing, and strategy suitability before entering trades.
Consult a SEBI-registered financial adviser before making any real trading decision. By engaging with this content, you acknowledge full responsibility for your trades and investments.
Position Status: No active position in THERMAX at the time of analysis.
Data Source: TradingView & NSE India (Past Chart Reference) (Historical levels)
💬 Found this useful?
🔼 Give this post a Boost to help more traders discover clean, structured learning.
✍️ Drop your thoughts, questions, or setups in the comments — let’s grow together!
🔁 Share with fellow traders and beginners to spread awareness.
👉 “If you liked this breakdown, follow for more clean, structured setups with discipline at the core.”
🚀 Stay Calm. Stay Clean. Trade With Patience.
Trade Smart | Learn Zones | Be Self-Reliant 📊
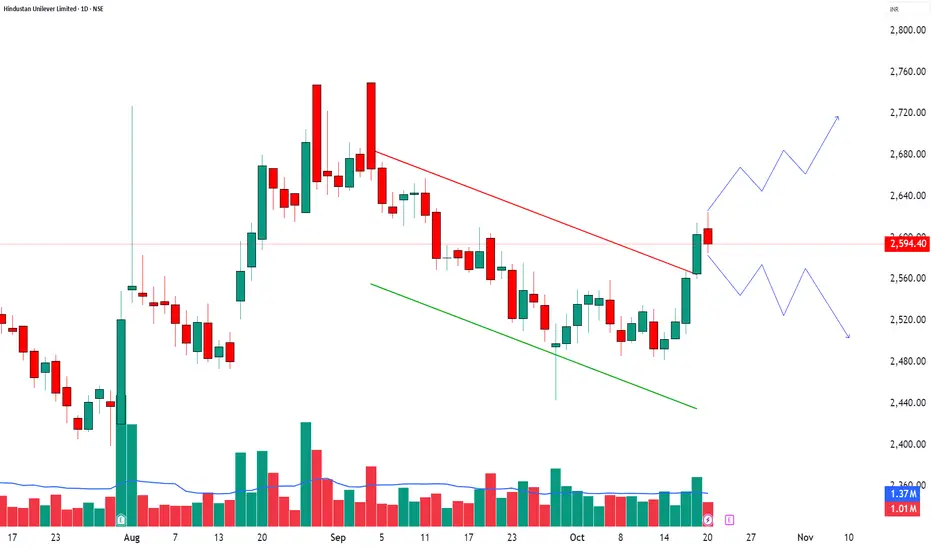
HINDUNILVR – Bulls Resting, Bears Watching💹 Hindustan Unilever Ltd (NSE: HINDUNILVR)
Sector: FMCG | CMP: ₹2,610.80 | View: Neutral-to-Bullish Zone Reaction Setup
Key Levels:
Resistance: 2618/2641/2657
Support: 2578/2562/2539
STWP Trade Analysis:
A Retested Demand zone: 2509.20 – 2482.30
Stock has moved up almost 4% in the last 4 days.
The bulls seem to have taken a rest at these levels.
Two possible scenarios:
🟢 Scenario 1 – Bulls Take Charge: I will buy @ 2624.70 with a stop at around 2583.45
View: Bullish continuation setup if price sustains above 2620 zone.
🔴 Scenario 2 – Bears Take Charge: I will sell at 2585.60 with a stop at around 2626.85
View: Reversal setup if price fails to hold above 2618 and selling pressure builds.
───────────────────────────────────────────────
⚠️ **DISCLOSURE & DISCLAIMER (SEBI-Compliant)**
───────────────────────────────────────────────
📘 **Purpose:**
This content is created **solely for educational and informational purposes** to help readers understand market structure, price action, and technical analysis.
It does **not constitute investment advice**, research recommendation, or a solicitation to buy or sell any security.
👤 **Author Disclosure:**
The author is **not a SEBI-registered investment adviser or research analyst.**
All chart studies, price levels, and observations are based on publicly available data (e.g., **NSE India**, **TradingView**) and are presented purely for **learning illustration**.
📊 **Position Status:**
No active position in * * at the time of publication.
“The author may sometimes trade in the securities discussed, but such trades are independent and shared here only for educational understanding.”
⚠️ **Risk Disclosure:**
Trading and investing involve financial risk. Market movements can be unpredictable, and losses may exceed invested capital.
Readers are strongly advised to consult a **SEBI-registered investment adviser** before making any trading or investment decisions.
🧠 **Responsibility Clause:**
By engaging with this post, you acknowledge that you are **solely responsible for your own trading or investment decisions**, and that this content is intended only for **market education and awareness**.
───────────────────────────────────────────────
💬 **Did You Find This Useful?**
If this analysis helped you understand price structure or market psychology better:
🔼 **Boost** to support transparent & structured financial education.
✍️ **Comment** your insights, observations, or questions — let’s learn together.
🔁 **Share** this post with learners and aspiring traders who value discipline.
📚 **Follow stwp** for more structured, educational breakdowns on stocks & setups.
🚀 *Stay Calm. Stay Clean. Trade With Patience.*
💡 *Trade Smart | Learn Zones | Be Self-Reliant.*
───────────────────────────────────────────────
NAUKRI - Demand Zone + Key Levels________________________________________________________________________________
📊 INFO EDGE (NSE: NAUKRI) – Beginner Chart Study | Demand Zone + Key Levels
🕒 Chart Timeframe: 15-Min | 📆 Updated: July 8, 2025
________________________________________________________________________________
🔍 What the Chart Shows:
NAUKRI recently bounced from a clearly defined demand zone and is now trading near a key mid-level. This educational post is meant to help understand how price behaves around such zones.
________________________________________________________________________________
✅ Zones to Observe for Strength (Upside):
• Above 1489.00: Price sustaining above this top range may indicate strength.
• Between 1432.35 and 1404.10: This broader zone has acted as support earlier. If revisited, watch how price behaves here.
________________________________________________________________________________
⚠️ Neutral / Observation Area:
• Around 1459.40 (near 1460.65): Price is consolidating near this level. It’s better to observe and wait for more clarity from price movement and volume.
________________________________________________________________________________
🔻 Zones to Observe for Weakness (Downside):
• Between 1460.65 – 1489.00: If price reacts negatively here (e.g., rejection candles or high supply volume), observe how it develops.
• Below 1402.85: This would invalidate the previous demand zone. Further weakness could be possible if price closes below.
________________________________________________________________________________
🧠 Learning Takeaways for Traders:
• Avoid trades in the middle zone without clear confirmation.
• Always wait for bullish or bearish patterns and supporting volume before considering action.
• Structure and levels help guide observation – not prediction.
________________________________________________________________________________
📌 Levels Recap:
• Top Range (Resistance): 1489.00
• Mid Resistance: 1460.65
• Mid Support: 1432.35
• Bottom Range: 1404.10
• Demand Zone Reference: 1414.20 – 1404.90 | SL Reference Level: 1402.85 (used for structure observation only)
________________________________________________________________________________
⚠️ Disclaimer (Please Read):
• This chart is shared for educational purposes only and is not investment advice.
• I am not a SEBI-registered advisor.
• The information provided here is based on personal market observation.
• No buy/sell recommendations are being made.
• Please do your own research or consult a registered financial advisor before making any trading decisions.
• Trading involves risk. Always use proper risk management.
________________________________________________________________________________
💬 Join the Discussion (Comments):
✅ Was this chart structure easy to understand?
✅ How do you look at such supply and demand zones in your charting?
✅ Want more beginner-focused educational charts? Drop a 💬 below.
✅ If you're learning technical analysis, follow for more such breakdowns.
________________________________________________________________________________

KOTAKBANK – Strong Call Long Build-Up________________________________________________________________________________
📈 KOTAKBANK – Strong Call Long Build-Up Signals Possible Upside Attempt
🕒 Chart: 15-Min | 📆 July 8, 2025
________________________________________________________________________________
🔍 What’s Catching Our Eye:
Buyers are aggressively building positions in multiple Call strikes from ₹2200 to ₹2320, hinting at bullish sentiment returning.
________________________________________________________________________________📌 What We’re Watching For:
If price sustains above ₹2240–₹2241.5, we may see a move toward ₹2300+ in the short term.
________________________________________________________________________________📌 OI Inference:
Call side is witnessing Long Build-Up (2240–2320, even 2400 CE), while Put side is under Short Build-Up, showing Put sellers are confident the downside is limited.
________________________________________________________________________________🔁 Trend Bias:
🟢 Bullish to Range-Bound – as long as price holds above ₹2200 with rising Call OI and falling PE premiums.
________________________________________________________________________________🧠 Trade Logic / Reasoning:
• Major Call strikes like 2240, 2260, 2300 under Long Build-Up
• 2200 CE shows Short Covering – a sign of prior bearish positions being exited
• Puts are mostly under Short Build-Up = downside cushion building
• Volatility is low = option buyers betting on directional breakout
________________________________________________________________________________📍 Important Levels to Mark:
🔺 Top Range (Resistance): ₹2241.5
🔻 Bottom Range (Support): ₹2111
🟢 Demand Zone: NA
🔴 Supply Zone: NA
________________________________________________________________________________🎯 Trade Plan (Educational Purpose Only):
✅ Buy (Equity): Above ₹2241.5 with strength and follow-through
✅ Sell (Equity): Only below ₹2200 if fresh PE Long Build-Up appears
✅ Best CE to Buy: ₹2240 CE or ₹2260 CE if price sustains above ₹2240
❌ Avoid Put Buying: Most Put options are under Short Build-Up (bearish bets getting closed)
📌 Strategy Idea (Low Risk):
Bull Call Spread – Buy ₹2240 CE, Sell ₹2300 CE
→ Works well if stock rises, and risk stays limited
________________________________________________________________________________⚠️ Invalidation Levels:
🔻 Below ₹2200 = Long view weakens
🔺 Above ₹2241.5 = bullish breakout confirmed
________________________________________________________________________________
⚠️ Disclaimer:
This is only for educational purposes.
STWP is not a SEBI-registered advisor.
Please consult a financial advisor before making trades.
STWP is not responsible for any trading decisions based on this content.
________________________________________________________________________________
💬 Will KOTAKBANK break out above ₹2240 or stay stuck?
⬇️ Share your view in the comments!
🔁 Repost this if you’re tracking the zone
✅ Follow STWP for clean Options + Price Action setups
🚀 Let’s trade with clarity and confidence!
________________________________________________________________________________

ASIAN PAINTS LTD – Gap Fill Setup Near Resistance | Price Action________________________________________________________________________________📈 ASIAN PAINTS LTD – Gap Fill Setup Near Resistance | Price Action Analysis
🕒 Chart Type: Daily (1D)
________________________________________________________________________________
🔍 What’s Catching Our Eye:
Price is testing a major resistance with a gap still left to be filled above.
________________________________________________________________________________
📌 What We’re Watching For:
A breakout above 2491 or a reversal from the resistance zone.
________________________________________________________________________________
📊 Volume Footprint:
Breakout occurred on slightly lower volume – caution advised.
________________________________________________________________________________
🔁 Trend Bias:
Short-term bullish with breakout momentum in play.
________________________________________________________________________________
🧠 Trade Logic / Reasoning:
Strong bullish candle with BB breakout and VWAP support suggest strength.
________________________________________________________________________________
📍 Important Levels to Mark:
Key zones are 2491 (Top) and 2124.75 (Bottom) for breakout or bounce setups.
________________________________________________________________________________
🎯 Trade Plan (Educational Purpose Only):
Best Buy:
Above 2491 on retest with volume; or near 2451–2419 with bullish reversal.
________________________________________________________________________________
Best Sell:
Below 2451 with rejection confirmation; or near 2520 if breakout fails.
________________________________________________________________________________
Demand Zone / Supply Zone: NA
________________________________________________________________________________
⚠️ Invalidation Below:
Breakdown below 2435 would invalidate current bullish bias.
________________________________________________________________________________
⚠️ Disclaimer:
This analysis is for educational purposes only.
STWP is not a SEBI-registered advisor.
No buy/sell recommendations are made.
Please consult your financial advisor before trading.
STWP is not responsible for trading decisions based on this post.
________________________________________________________________________________
💬 Found this helpful?
Will Asian Paints Breakout or Fakeout
Share your thoughts in the comments ⬇️
🔁 Spread the insight with fellow traders
✅ Follow STWP for smart technical setups backed by volume and price action
🚀 Let’s trade with patience, logic, and clarity!
Be Self-Reliant | Trade with Patience | Learn with Logic
________________________________________________________________________________

BRITANNIA INDUSTRIES LTD. – TECHNICAL INSIGHT________________________________________________________________________________
📊 BRITANNIA INDUSTRIES LTD. – TECHNICAL INSIGHT
📆 Date: July 8, 2025 | 🕒 Daily Chart
📍 Symbol: NSE: BRITANNIA
💡 Educational Breakdown – For Study & Learning Only
________________________________________________________________________________
🔹 Price Action Overview:
Britannia closed at ₹5,884.00, up by +1.95%, forming an “Above the Stomach” bullish continuation pattern just below a key resistance zone.
________________________________________________________________________________
🔴 Top Range (Resistance): ₹5,899.50
📉 Bear Strength: 53
The price has approached a previous supply zone where sellers have shown resistance. Watch this level closely for either a breakout or rejection.
________________________________________________________________________________
🟢 Bottom Range (Support): ₹4,506
📈 Bull Strength: 77
This zone acted as a strong demand base in the past, initiating a rally with a sharp volume spike.
________________________________________________________________________________
🔍 Pattern Focus: Above the Stomach
A bullish candle has opened above the midpoint of the previous red candle, suggesting buyer strength. This often signals momentum continuation, especially near breakout levels.
________________________________________________________________________________
🎯 What to Watch For:
✅ Breakout Confirmation Zone:
If price closes decisively above ₹5,900 with volume expansion, it may indicate strength and fresh upside continuation.
________________________________________________________________________________
🚫 Failure Zone:
If price faces rejection near ₹5,900–₹5,920 and forms a bearish engulfing or strong upper wick, short-term profit booking could occur.
________________________________________________________________________________
📌 Risk Management Tip:
Traders typically look for entry above breakout candle high with a stop below recent swing low or candle low. Volume confirmation is essential before considering directional bias.
________________________________________________________________________________
🔍 Contextual Takeaway:
This is a textbook example of price consolidating just below a resistance after a strong trend and forming a bullish candle setup. A breakout or failure here can define the next leg of the move.
________________________________________________________________________________
📚 Stay objective, wait for confirmation, and let the price lead.
________________________________________________________________________________
Entry Above ₹5,905–₹5,920 (on breakout)
Stop Loss ₹5,765
Risk Reward 1:1 | 1:2 +
________________________________________________________________________________
⚠️ Disclaimer:
This analysis is for educational purposes only.
STWP is not a SEBI-registered advisor.
No buy/sell recommendations are made.
Please consult your financial advisor before trading.
STWP is not responsible for trading decisions based on this post.
________________________________________________________________________________
What’s your view on BRITANNIA ? Comment below ⬇️
🔁 Share this if you're tracking the stock
✅ Follow STWP for clean Price Action + Candlestick patterns
🚀 Be Self-Reliant | Trade with Patience | Learn with Logic
________________________________________________________________________________

HDFCBANK – Heavy Call Writing Near 2000 Zone________________________________________
📈 HDFCBANK – Heavy Call Writing Near 2000 Zone | OI + Price Action Analysis
🕒 Chart Type: 15-Minute
📆 Date: July 7, 2025
________________________________________
🔍 What’s Catching Our Eye:
HDFCBANK closed at ₹1987.4, and the entire Call side from ₹1980 to ₹2100 is showing strong Short Build-Up, clearly suggesting resistance building up ahead, especially around ₹2000–₹2040 levels.
Meanwhile, Put side shows Long Unwinding at ₹2000 PE, suggesting lack of bullish confidence at current levels.
________________________________________
📌 What We’re Watching For:
Watch the zone between ₹2004.70 – ₹2007.90 very closely – it’s a visible Supply Zone based on price rejection + heavy CE OI.
If HDFCBANK fails to break and sustain above ₹2009.30 (SL), bears may take control again and drive it back to ₹1980 or below.
________________________________________
📊 Volume Footprint:
Heavy CE volumes hint at active resistance:
• ₹2000 CE – 9.3k+ contracts
• ₹2060 CE – 7.8k+ contracts
• ₹2020 CE & ₹2040 CE – ~5.6k contracts each
→ Strong presence of Call writers near current levels, pressuring the upside.
________________________________________
📈 Option Chain Highlights:
Calls (Short Build-Up):
• ₹2000 CE: +1,93,600 OI | Price ↓ 8.87%
• ₹2060 CE: +10,04,300 OI | Price ↓ 16.67% ✅ Major resistance buildup
• ₹2020 CE: +6,90,800 OI | Price ↓ 11.42%
• ₹2040 CE: +5,83,550 OI | Price ↓ 15.13%
• ₹1980 CE: +2,17,800 OI | Price ↓ 6.44%
• ₹2100 CE: +2,00,200 OI | Price ↓ 17.76%
Puts:
• ₹2000 PE: -84,150 OI | Price ↓ 0.87% → Long Unwinding = Bullish weakness
• ₹1980 PE: +6,050 OI | Price ↓ 2.33% → Weak Short Build-Up
📌 Inference:
Call writers are dominating the entire upper side. There’s no strong Put writing, and PE writers are exiting positions at ATM — this confirms limited bullish conviction.
________________________________________
🔁 Trend Bias:
🔴 Bearish to Range-Bound – unless ₹2009.30 gets taken out on closing basis
________________________________________
🧠 Trade Logic / Reasoning:
• Heavy Short Build-Up in all major CE strikes
• Lack of Put writing near spot
• Supply Zone aligning perfectly with Option Chain resistance
→ Expect rejection or pause unless strong buyers break ₹2009.30 with volume.
________________________________________
📍 Important Levels to Mark:
🔺 Top Range (Resistance): ₹2008
🔻 Bottom Range (Support): ₹1980
________________________________________
🎯 Trade Plan (Educational Purpose Only):
✅ Best Buy (Equity): Above ₹2009.30 with a bullish candle and volume
✅ Best Sell (Equity): Below ₹2004.70 for quick move to ₹1980
✅ Best CE to Long: None – CE side is under Short Build-Up
✅ Best PE to Long: ₹1980 PE if price starts rejecting ₹2000 zone again
🟢 Demand Zone: ₹1965 – ₹1980 (Intraday Bounce Possible)
🔴 Supply Zone: ₹2004.70 – ₹2007.90 (SL: ₹2009.30)
⚠️ Invalidation Levels (With Logic):
🔻 Bullish View Invalid Below: ₹1980 – breaks structure and confirms weakness
🔺 Bearish View Invalid Above: ₹2009.30 – a breakout above this level with volume + PE Short Build-Up will invalidate bearish trades
________________________________________
⚠️ Disclaimer:
This analysis is for educational purposes only.
STWP is not a SEBI-registered advisor.
No buy/sell recommendations are made.
Please consult your financial advisor before trading.
STWP is not responsible for trading decisions based on this post.
________________________________________
💬 Rejection from ₹2000 or breakout above ₹2009?
What’s your view on HDFCBANK? Comment below ⬇️
🔁 Share this if you're tracking the zone
✅ Follow STWP for clean Price Action + OI Trades
🚀 Let’s trade with clarity and confidence!
________________________________________
