EURUSD Weekly Outlook - 10/11/205 to 14/11/2025Wassup Lads!
So this week we can see that EU closed sharply into the week rejecting the lows, there's a strong rejection candle on the weekly time frame and price has displaced higher forming a daily swing point and a daily fair value gap as well, so what I would be looking for price is to do this -
1. Price range on Monday
2. Manipulte into the daily fair value gap.
3. Look for smt divergence during key times
4. Would look for longs
This is my plan for EU this coming week.
Do your own research, manga risk and stay disciplined bois.
Let's win this week!
SMC-ICT

My Journal Trade 2 - ETHUSDT LONGThis was a counter trade in a downtrend, low probability and also weekend, however it looked super clean and I took it. Coming to the trade
1. SMT between PDLs b/w ETH and BTC
2. Price tapped into H4 FVG
3. Smt with BTC in the H4 FVG
4. Target a basic 1 to 2 Risk to Reward
So this was a success. A risky one in a downtrend though, took it because it has all the elements of a good trade setup barring the time.

BTC forming wonderful scenarioBTC is forming good scenarios for bullish and subsequently bearish trade. It has created ABC pattern and retracing back to bullish FVG. We need to wait for price getting into right zones. We may also see a sell side trade once reaches to bearish FVG.
1. Currently price has broken ABC pattern neckline and retracing towards 1h FVG.
2. We may also see a sell side trade once price tap into bearish FVG and shows reversal pattern.
3. Most probably price will take liquidity of FVG and create MSS/CISD/TS/iFVG in LTF.
4. Price should show rejection/reversal in LTF (5m,1m) at FVG zone.
5. Take the trade only once clear entry model i.e. turtle soup. iFVG break, CDS or MSS happens on LTF
All these combinations are signalling a high probability and ~4R trade scenario.
Note – if you liked this analysis, please boost the idea so that other can also get benefit of it. Also follow me for notification for incoming ideas.
Also Feel free to comment if you have any input to share.
Disclaimer – This analysis is just for education purpose not any trading suggestion. Please take the trade at your own risk and with the discussion with your financial advisor.

Beautiful 6R BTC trade scenariosBTC is forming both buy and sell side trades as the price is in critical zone. BTC will possibly give us both side good trades. We need to wait for price getting into right zones.
1. Currently price is moving around daily and 4H gradient levels.
2. 125275 level is creating a gradient cluster of both 1d and 4h time frame. Which may give us a good sell side trade if price show clear reversal signals.
3. There is an 1hour iFVG if price takes liquidity of it, most probably it will touch gradient cluster level and good sell scenario may be confirmed.
4. There are several SIBIs which may be target for it and further buy side reversal trade.
5. Buy side reversal trade may be good trade as overall BTC order flow is upside.
6. Most probably price will take liquidity of FVGs and create MSS/CISD/TS/iFVG in LTF.
7. Price should show rejection/reversal in LTF (5m,1m) at FVG zone.
All these combinations are signalling a high probability and 5.5R trade scenario.
Note – if you liked this analysis, please boost the idea so that other can also get benefit of it. Also follow me for notification for incoming ideas.
Also Feel free to comment if you have any input to share.
Disclaimer – This analysis is just for education purpose not any trading suggestion. Please take the trade at your own risk and with the discussion with your financial advisor.

ETHUSD 2.5R sell side trade scenarioETHUSD is forming sell side trades as current bias and draw on liquidity both are at down side. Price has also left SIBIs to attract price upside for a while and then return back to target. In weekend price may have low volatility and trade possibly generate on Monday or later.
1. There is a daily time frame bearish FVG.
2. There is bearish FVG in 4H TF. Now price is approaching it slowly.
3. These FVGs are forming inside OTE zone.
4. Order flow is bearish. And draw on liquidity is also at downside.
5. Most probably price will take liquidity of FVGs and create MSS/CISD/TS/iFVG in LTF.
6. Price should show rejection/reversal in LTF (5m,1m) at FVG zone.
7. BTC is also forming similar scenario.
All these combinations are signalling a high probability and 2.5R trade scenario.
Note – if you liked this analysis, please boost the idea so that other can also get benefit of it. Also follow me for notification for incoming ideas.
Also Feel free to comment if you have any input to share.
Disclaimer – This analysis is just for education purpose not any trading suggestion. Please take the trade at your own risk and with the discussion with your financial advisor.

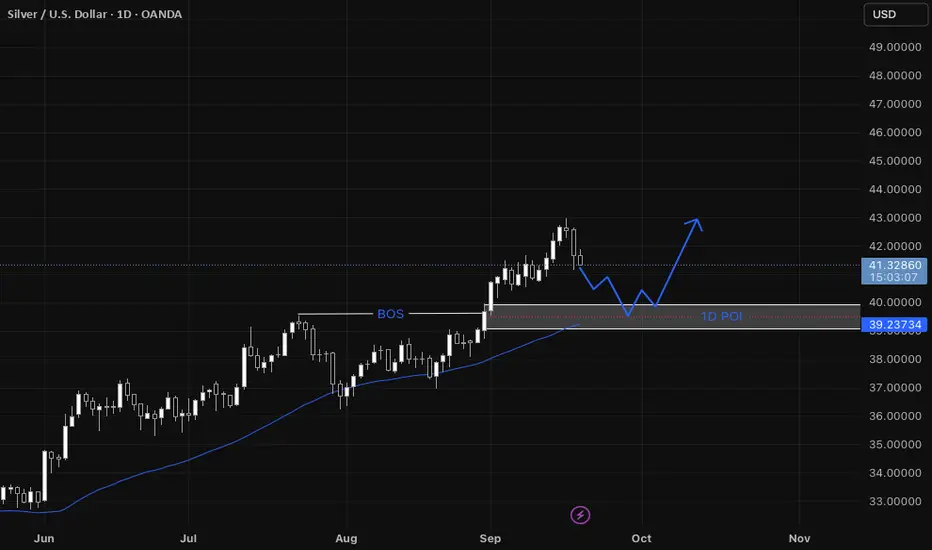
XAGUSD Step-by-step entry plan for XAGUSD
1. We have our Daily Point of Interest (POI)
- On the daily a zone that contains:
* a fair value gap (FVG),
* a break of structure (BOS) that previously acted as resistance and is now expected to act as support, and
* support from the 44 SMA.
2. Wait for price to return to the Daily POI
- Only consider the setup if price actually comes back into that daily POI zone.
3. Switch to the 1-hour timeframe to refine the entry
- Look for a shift in structure on the 1-hour (i.e., evidence that momentum is shifting bullish: BOS to the upside, higher highs/higher lows).
4. Confirm a 1-hour fair value gap forms
- The structure shift on 1-hour should create a 1-hour FVG (a short intraday imbalance).
5. Wait for the 1-hour FVG to be filled
- Let price fill that 1-hour FVG (price moves into/through the gap).
6. Look for a bullish confirmation on the filled 1-hour FVG
- After the fill, require a clear bullish formation on 1-hour (examples: bullish engulfing candle, strong demand candle, a higher-low + rejection wick).
7. Enter on the 1-hour bullish confirmation
- Enter when price breaks the confirmation level (e.g., breaks above the local 1-hour high formed by the bullish setup) or on a confirmed bullish candle close per your entry rules.
USDJPY Sell entry 1::5 RnRUSDJPY is forming a beautiful day trade for selling side. It can be a very good intraday trade if everything goes as per plan.
1. Price kissed 4H Iceberg Block and showed sniper liquidity and left bearish FVGs at both 30m and 15m.
2. 15m FVG is inside 30m FVG and upper side of OTE area.
3. Now it is moving toward FVG areas after taking reversal from bullish 15m BPR
4. Most probably price will take liquidity of FVG and OTE zone and create MSS in LTF.
5. Order flow confirming bearish bias.
6. Price should show rejection/reversal in LTF (5m,1m) at FVG zone.
All these combinations are signalling a high probability and high Risk and Reward (1:5) trade scenario.
Note – if you liked this analysis, please boost the idea so that other can also get benefit of it. Also follow me for notification for incoming ideas.
Also Feel free to comment if you have any input to share.
Disclaimer – This analysis is just for education purpose not any trading suggestion. Please take the trade at your own risk and with the discussion with your financial advisor.

Gold (XAUUSD) 1:4 intraday buy scenario.Gold is in up move and forming a good buy scenario on 30/15-minute chart. It can be a very good intraday trade if everything goes as per plan.
1. 30/15m bullish FVG is pending and price is showing pull back towards it.
2. Most probably price will take liquidity of FVG and OTE zone and create MSS in LTF.
3. Order flow confirming bullish bias.
4. Price should show rejection/reversal in LTF at FVG zone.
All these combinations are signalling a high probability and high Risk and Reward (1:4) trade scenario.
Note – if you liked this analysis, please boost the idea so that other can also get benefit of it. Also follow me for notification for incoming ideas.
Also Feel free to comment if you have any input to share.
Disclaimer – This analysis is just for education purpose not any trading suggestion. Please take the trade at your own risk and with the discussion with your financial advisor.

BTC developing a good sell opportunityBTC is moving in range for long time. Now it has shown a displacement after ChoCH and formed a bearish 15m FVG. There may be a good trade at sell side if price approach it. Well there are two trade scenarios are forming.
1. Price moves to 15m FVG and OTE overlap zone.
2. Most probably price will take liquidity of FVG and OTE zone and create MSS in LTF.
3. After breaking trend line it should pullback till FVG/trend line or any newly created OB/FVG.
All these combinations are signalling a high probability and high Risk and Reward (1:8) trade scenario.
Note – if you liked this analysis, please boost the idea so that other can also get benefit of it. Also follow me for notification for incoming ideas.
Also Feel free to comment if you have any input to share.
Disclaimer – This analysis is just for education purpose not any trading suggestion. Please take the trade at your own risk and with the discussion with your financial advisor.

ETH multiple Sell OpportunitiesETH is moving in range for almost a week time. Now it has shown a displacement after ChoCH and formed a bearish 15m FVG. There may be a good trade at sell side if price approach it. Well there are two trade scenarios are forming.
Trade # 1
1. Price is moving around a short term trend line and resistance.
2. If price breaks trend line and take the liquidity of resistance than it may be sell trade.
Trade # 2
3. Price moves to 15m FVG and OTE overlap zone.
4. Most probably price will take liquidity of FVG zone and break trend line.
5. After breaking trend line it should pullback till FVG/trend line or any newly created OB/FVG.
All these combinations are signaling a high probability and high Risk and Reward (1:8) trade scenario.
Note – if you liked this analysis, please boost the idea so that other can also get benefit of it. Also follow me for notification for incoming ideas.
Also Feel free to comment if you have any input to share.
Disclaimer – This analysis is just for education purpose not any trading suggestion. Please take the trade at your own risk and with the discussion with your financial advisor.

Gold (XAUUSD) forming wonderful sell scenarioGoldUSD price is moving at higher side and showing weakness. It is also forming double top kind of scenario. We may see a good short trade if liquidity sweep is witness at the resistance level with the additional confirmation of higher volume. Overall trend is still upside but buyers seems exhausted. We may find a good sell trade if Liquidity sweeps at resistance and everything goes as we planned.
1. Price is approaching 4H resistance zone. Which may act as a strong supply zone.
2. Buying is slow and weak.
3. Most probably price will take liquidity of resistance zone and break trend line.
4. After breaking trend line it should pullback till resistance/trend line or any newly created OB/FVG.
All these combinations are signalling a high probability and high Risk and Reward (1:8) trade scenario.
Note – if you liked this analysis, please boost the idea so that other can also get benefit of it. Also follow me for notification for incoming ideas.
Also Feel free to comment if you have any input to share.
Disclaimer – This analysis is just for education purpose not any trading suggestion. Please take the trade at your own risk and with the discussion with your financial advisor.

NZDUSD Forming a Great Sell side scenario....NZDJPY is approaching 4H resistance zone, which has already show rejection previously. There is also a steep bullish trend line creating a confluence. There is a valid 4H FVG at upside. All these things signalling a coming very good sell side opportunity. Below are points detailing the same.
1. Price is approaching 4H resistance zone. Which may act as a strong supply zone.
2. Very steep Bullish Trend line developing a confluence at resistance. Steep trend line is always prone for breakout/breakdown.
3. Most probably price will take liquidity of resistance zone and break trend line.
4. After breaking trend line it should pullback till resistance/trend line or any newly created OB/FVG.
5. There are two possible reversal point 1. At nearest resistance. 2. At 4H FVG and higher trendline.
All these combinations are signalling a high probability and high Risk and Reward (1:8) trade scenario.
Note – if you liked this analysis, please boost the idea so that other can also get benefit of it. Also follow me for notification for incoming ideas.
Also Feel free to comment if you have any input to share.
Disclaimer – This analysis is just for education purpose not any trading suggestion. Please take the trade at your own risk and with the discussion with your financial advisor.

Buy Opportunity in USOILAn upside opportunity is being developed. Scenario.
1. Choch has happened and price retracing towards FVG.
2. it is also taking support from trendlines.
3. If price rejects with volume in FVG zone, it may lead to good upside trade.
P.s. - It is just analysis not trading recommendation.

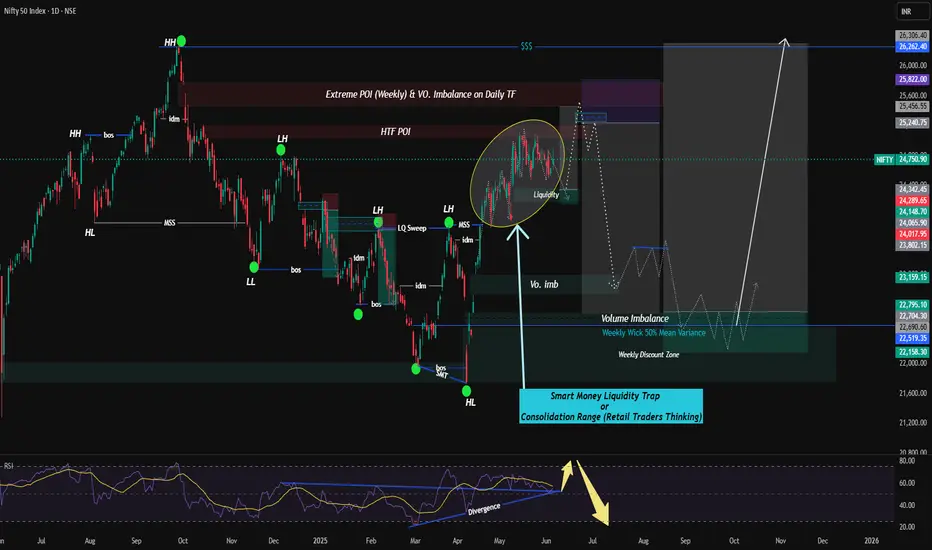
Nifty Analysis - Smart Money Concepts or LiquidityI would like to present my Nifty Analysis based on Liquidity or Smart Money Concepts.
This Analysis is based on Multi-time frame (Weekly & Daily) Time Frame. here chart is used on Daily Time Frame.
Current Scenario - (Weekly TF Analysis)
==Weekly Time Frame Analysis -
The current move is retracing into a weekly POI zone which also has-
-Daily Imbalance
-HTF Supply Block
-Smart Money Trap Zone (marked)
Right now, HTF is still in broad bearish retracement structure.
==Daily TF Annalysis -
-Price is consolidating in a range within a clearly defined HTF POI (High Probability Reversal Area)
-Inside the range:
-Multiple internal BOS & MSS
-Clean liquidity pool build-up (marked in yellow)
-Potential for buy-side liquidity sweep followed by sell-off into discount
Price Projection & Bias -----
1. Short-Term Bias (Next 3–5 Weeks): Downside after Extreme POI liquidity grab
-Expectation is there will be a Fakeout above the liquidity pool (25,500–25,800), or in retail language say it is Stop Loss Hunt then sell-off.
-Target: Volume Imbalance near 23,200–22,700.
-This will be aligned with - Liquidity sweep , Mitigation of volume imbalance , Entry into Weekly Discount Zone.
2. Mid-Term Bias or say 2-3 months expectation (After Re-accumulation)
-If price reacts with storng bullish order flow from 22500-22000 range then expect -
-Reversal into bullish structure
-Target - 26200 or 26400
-Supported by mean reversion + reaccumulating idea
(For Entry Module)
- Consider 15min to 1 hour Time frame setup for confirmation before taking shorts from above supply zone.
- expect a long setup around 22200-22400 only if bullish BOS + FVG Filled and also consider HTF Liquidity sweep near weekly wick discount zone or say 50% mean reversion.
Disclaimer -- (Views are only for Educational Purpose only. Always consult your financial Advisor before doing Any Investments).
Your Views or Comments are welcomed.
AUDNZD 2H Chart Analysis – Trendline Break + Supply Zone Rejecti🧾 Market Context:
Pair: AUDNZD
Timeframe: 2H (2-Hour)
Overall Bias: Bearish
Setup Type: Trendline Break → Lower High Formation → Supply Zone Retest → Bearish Continuation
📊 Technical Breakdown:
🔸 1. Trendline Break:
A steep ascending trendline has been broken decisively, marking a clear end of bullish structure.
This shift indicates that buyers have lost control and bears are stepping in.
🔸 2. Retest of Supply Zone (Breaker Block):
After breaking the trendline, price retraced into a supply zone (highlighted in grey).
This zone also acts as a breaker block – price broke support, and now it’s acting as resistance.
Rejection from this area confirms institutional selling pressure.
🔸 3. Lower High Formation:
The price failed to break back above the supply zone, forming a lower high, which is a classic bearish market structure signal.
Trendline retest + supply zone rejection together give confluence.
🔸 4. Bearish Projection Path:
Your chart outlines a clear path of expected price movement:
Minor bounce from intermediate demand (1.0780–1.0790)
Continuation downward toward final target zone at 1.0650–1.0660
🔽 Entry & Trade Plan:
Parameter Details
Entry Area 1.0820 – 1.0840 (confirmed rejection)
Stop Loss Above 1.0855 (above the supply zone high)
Target 1 1.0770 – 1.0780 (intermediate demand zone)
Target 2 1.0650 – 1.0660 (major demand zone)
RR Ratio Around 1:3 to 1:4 depending on entry
✅ Bearish Confluences:
✅ Trendline break + retest
✅ Supply zone rejection
✅ Lower high formation
✅ Bearish engulfing candle post-retest
✅ Clear break of structure (BOS)
✅ Liquidity sweep above previous high before dumping
⚠️ Invalidation Criteria:
If price closes above 1.0855 on a 2H/4H candle, it invalidates the bearish setup.
In that case, reanalyze for potential continuation or false breakout.
📈 Visualization Path:
🔹 Current price is consolidating slightly below the retest zone.
🔹 You anticipate a drop to intermediate support, possible small bounce, then continuation to major target.
🧠 Professional Summary:
This is a textbook bearish trend reversal setup:
Break of bullish trendline
Supply zone retest and rejection
Structure shift to lower lows/lower highs
Bearish order flow developing
If momentum follows through, your TP at 1.0650 is very realistic.

WILL THIS ORDER BLOCK HOLD AND REVERSE THE PRICE OR NOTWhether an order block will hold and reverse the price cannot be guaranteed; while it indicates a potential area for price reversal due to accumulated buy or sell orders, several factors like market conditions, price action, and volume need to be considered to assess the likelihood of a reversal at that level

WILL THIS BEARISH ORDER BLOCK HOLD THE PRICE OR NOT.To evaluate whether a bearish order block will hold the price, it typically need to consider several factors, including:
1. **Market Context**: Understand the current market sentiment (bullish or bearish) and trend. Is the overall market in a downtrend, or is there potential for a reversal?
2. **Time Frame**: The significance of an order block can vary depending on the time frame you’re analyzing. Higher time frames (like daily or weekly) usually carry more weight than lower time frames (like hourly or 15 minutes).
3. **Price Action**: Look at the price action leading up to the order block. Is there momentum in either direction? Are there significant support or resistance levels nearby?
4. **Volume**: Analyze trading volume around the order block. High volume may indicate stronger conviction in the price action, while low volume could suggest a lack of interest.
5. **Market News and Events**: Economic releases, earnings reports, or geopolitical events can impact price behavior and may affect whether an order block holds.
6. **Liquidity**: Ensure that the market has enough liquidity to sustain price levels around the order block.
Always conduct thorough analysis and consider risk management practices in trading.

a bearish order block failed to hold the price in it. Here’s an analysis of the situation:
Bearish Order Block Defined:
The bearish order block is the last bullish candle before a significant downward movement, often acting as a supply zone where sellers are expected to be strong.
Reasons for the Wick Break:
Liquidity Grab (Stop Hunt): The wick could represent a liquidity grab, where price briefly breaks above the bearish order block to trigger stop-loss orders placed by sellers or to entice breakout buyers before reversing.
Market Imbalance: There could have been a need to fill orders at higher levels due to prior inefficiencies or imbalance in the market.
Strong Bullish Momentum: If buyers were dominant, the bearish order block might have failed to hold the price, albeit temporarily.
News or Economic Events: Unexpected news or data releases could cause a spike in volatility, leading to such wick formations.
Outcome of the Wick:
Following the wick, it seems the price returned below the bearish order block, indicating that it was likely a false breakout or liquidity grab, and the bearish order block remained relevant.
I also love to here more solutions from you. Feel free to comment...

USDZARUSDZAR seem to be programed not to trade below the 18.00 price. I would really like to see a small pull back before we shhot up, its gonna be a sniper entry or nothing, you can set an pending order for buy or patiently wait for manual execution. Remember to use pro risk management. Lets Download Success.

Bank Nifty Analysis For 19th March 2024Bank Nifty has made a lot of Imbalance (46345 - 46981 ) to be filled on the down side. spend some time inside the Demand zone marked and then slowly move up towards the high. But looking at the market conditions, it looks like it can break the Demand zone and move down lower.
This is my personal Analysis for my personal trading.
Im Not SEBI Registered.

GBPUSD 4h Setup For Buy-sidePrice have taken IDM and confirmed our new HH, looking for entry when price fills the FVG and gives entry setup with 15min confirmation.

ADANIENTAdani is bearish expecting the price to run above the supply zone, before reaching the downside.
expecting to reach 2260. then will sell again.
as the end of the trendline. that's the target i am expecting here.
#Demand #supply #smartmoneyconcepts #smc
