Bassi MA Entry Helper MTF EMA , VWMA Swing , ADX , SMA200 , TPBassi MA Entry Helper is an advanced multi-timeframe confluence system designed to identify high-probability entries using trend, volume, market structure, and volatility filters.
It is built for traders who want cleaner signals, fewer false entries, and strong multi-confirmation setups.
Key Features
Multi-Timeframe EMA Crossovers – HTF signal engine
SMA200 Trend Filter – prevents counter-trend trades
VWMA Swing Confirmation – volume-validated micro-swings
ADX Filter – only trade when the trend has strength
Fractal Structure Mapping – identifies swing highs/lows
Retracement Filter – confirms pullbacks before entries
TP/SL Automation – ATR or percentage based
Clean Entry Labels – main & additional entry signals
Highly Customizable – mode, timeframe, filters, visuals
This script is ideal for:
Scalping • Intraday • Swing • Trend continuation • Volume-based setups • Multi-timeframe alignment
How It Works
Main Buy/Sell Signals
Triggered when:
✔ Fast EMA crosses Slow EMA (HTF)
✔ Price aligned with trend
✔ SMA200 filter valid
✔ VWMA confirmation (optional)
✔ ADX strong
✔ Retracement valid (optional)
Additional Buy/Sell Signals
Triggered when VWMA crosses Slow EMA during trend continuation.
TP/SL System
You can choose between:
%-based take-profit & stop-loss
ATR-based dynamic levels
Automatically projects clean visual levels on your chart.
Notes
This indicator does not repaint and is suitable for both real-time and historical analysis.
Always combine signals with proper risk management.
Initial Release – v1.0
Added multi-timeframe EMA engine
Added SMA200 trend filter
Added VWMA swing entries
Added ADX strength filter
Added retracement filter
Added fractal swing detection
Added TP/SL auto plotting
Added main & additional entry labels
Performance optimized
Moving Averages
UMA Scalping Level 2025UMA Scalping Level 2025は、「直近で市場が意識している高値・安値ライン」と
「短期トレンドの勢い(EMAクロス)」を同時に捉えるスキャルピング特化型インジケーターです。
"UMA Scalping Level 2025" is a scalping-focused indicator that simultaneously captures the recent key swing highs and lows that the market is reacting to, and the short-term momentum identified by EMA crossovers.

EMA/Volume/Institutional Candle (Deep)This indicator is designed for short-term swing trading and intraday trend identification using a combination of EMA structure, momentum shifts, volume confirmation, and institutional footprint analysis.
🔹 Key Features
1. EMA Trend Framework (9, 20, 50, 200)
✔ EMA 9 & EMA 20: Ultra-short-term momentum; ideal for fast trend shifts.
✔ EMA 50: Medium-term trend guide; helps identify pullbacks vs. reversals.
✔ EMA 200: Long-term trend bias and major dynamic support/resistance.
2. EMA 9/20 Crossover Signal
✔ Bullish Crossover → EMA 9 crossing above EMA 20 indicates momentum expansion and early trend reversal.
✔ Bearish Crossover → EMA 9 crossing below EMA 20 shows momentum weakening and possible short-side opportunity.
3. High-Volume Zone Detection
✔ Highlights candles with volume spikes above average, signaling institutional interest.
✔ Useful for identifying breakout validity, liquidity grabs, or trap candles.
4. Institutional Candles (Smart Money Footprint)
✔ Automatically marks institutional order blocks, imbalance zones, or large displacement candles.
✔ Helps traders identify where smart money entered the market and potential mitigation zones.
🎯 How This Indicator Helps You Trade
✔ Quickly spot trend direction with multi-EMA alignment
✔ Identify high-probability entries with EMA 9/20 crossover + volume confirmation
✔ Find institutional zones for sniper-style entries
✔ Filter fake breakouts using volume spikes
✔ Perfect for stocks, indices, crypto, and forex

Daily Close Breakout 20/10 + 200 (Signals)Daily Close Breakout 20/10 + 200 (Signals)
A simple “check once per day” breakout signal tool designed for the Daily (1D) chart.
Quickstart:
* Signals are confirmed at the daily candle close.
* If a triangle prints today, the earliest you act is the next day’s open (not the same candle).
* Green triangle = consider entering long.
* Red triangle = consider exiting.
* Long-only (no shorts).
How to use:
* Use on the Daily (1D) timeframe.
* Check the chart once per day after the daily candle closes.
* Do not act intraday on signals.
Rules (default settings 20 / 10 / 200):
* BUY: A green up triangle prints when the daily close is above the prior 20-day high and above the 200-day Simple Moving Average.
* SELL: A red down triangle prints when the daily close is below the prior 10-day low.
Lines and colors:
* Prior 20-day high (entry level): red
* Prior 10-day low (exit level): yellow
* 200-day Simple Moving Average: aqua
Notes:
* Best used on the Daily (1D) timeframe. Other timeframes may behave differently.
* This script plots signals and reference levels only. For performance metrics, use a matching strategy/backtest script.
* Educational use only. Not financial advice.

Breakout Scanner Checklist for Swing Trades📈 EOD Breakout Scanner Checklist Overview
This indicator combines Mark Minervini's legendary Trend Template criteria with additional breakout detection enhancements, specifically optimized for end-of-day (EOD) scanning and Qullamaggie-style momentum trading.
Perfect for swing traders who scan stocks after market close and execute breakout entries on the first 5-minute candle after market open.
🎯 Core Features
1. Complete Minervini Trend Template (8 Criteria)
Implements all 7 rules from Mark Minervini's trend template methodology:
- Price above 150 & 200 day EMAs (long-term uptrend)
- EMA(150) above EMA(200) (trend alignment)
- EMA(200) trending up for at least 1 month (sustained trend)
- EMA(50) above both 150 & 200 EMAs (intermediate strength)
- Current price above EMA(50) (short-term momentum)
- Price at least 25% above 52-week low (sufficient rally)
- Price within 25% of 52-week high (near strength)
- (additional) Price within 10% above EMA(10) (not overextended)
2. Enhanced Breakout Detection (Toggle On/Off)
Three powerful enhancements that can be individually enabled:
Stage Analysis - Identifies stocks in Weinstein Stage 2 (advancing phase)
- Confirms proper EMA alignment
- Validates upward slope of 200 EMA
- Filters out late-stage or declining trends
Volatility Squeeze - Detects "coiled spring" setups
- ATR compression (recent volatility < 80% of average)
- Bollinger Band squeeze detection
- Identifies tight consolidations before explosive moves
Price Action Quality - Measures clean accumulation
- Up/down day ratio (prefers >1.2 ratio)
- Controlled price range (< 20% over 20 days)
- Filters erratic, whipsaw price action
3. Dual Table System
Main Table - Focus on what matters
- Shows only enabled enhanced criteria
- 🚀 BREAKOUT SIGNAL - Clear YES/NO verdict
- Clean visual hierarchy
Support Table (Optional) - Deep dive analysis
- All 8 Minervini criteria with status
- Can be toggled on/off for cleaner charts
- Perfect for understanding why a signal triggered
🔧 How To Use
For EOD Scanning:
- Run this indicator on your stock universe after market close
- Look for stocks showing 🚀 BREAKOUT SIGNAL = YES for quick scan or use the support table to reach more details for deep down analysis
- Add the stocks falls with your criteria to your watchlist for the next trading day
For Intraday Execution:
- At market open, watch your watchlist from EOD scan
- Identify the pivot point (recent resistance high, possible PDH)
- Wait for price to break above pivot on first 5-min candle
- Confirm with volume
- Enter if both price + volume confirm breakout
Note on Volume:
This indicator intentionally does NOT include volume confirmation in the signal, as it's designed for EOD scanning. You should manually verify volume when the actual breakout occurs at market open.
🎨 Visual Features
- EMA(10) Zone: Purple shaded area showing 10% zone above EMA(10)
- 52-Week High/Low Lines: Orange reference lines (toggleable)
- Modern Dark Theme: Low-contrast, professional design easy on the eyes
- Clean Status Indicators: ✓ for pass, ✗ for fail
⚙️ Customizable Settings
Display Options:
- Toggle 52-week high/low lines
- Toggle EMA(10) +10% zone
- Adjust lookback periods
Enhanced Detection:
- Enable/disable Stage Analysis
- Enable/disable Volatility Squeeze
- Enable/disable Price Action Quality
Panel Settings:
- Position tables (top/middle/bottom, left/center/right)
- Show/hide Minervini criteria support table
📚 Best For
✅ Swing traders looking for momentum breakouts
✅ Traders using EOD scanning + intraday execution
✅ Minervini/O'Neil CANSLIM methodology followers
✅ Qullamaggie-style breakout traders
✅ Anyone seeking high-probability setups with institutional backing
💡 Trading Strategy Context
This indicator is based on proven methodologies:
- Mark Minervini: SEPA (Specific Entry Point Analysis) and Trend Template
- Kristjan Qullamaggie: Momentum breakouts with volume confirmation
- Stan Weinstein: Stage Analysis for market cycle timing
Combined, these create a powerful framework for identifying stocks with:
- Strong institutional sponsorship
- Proper trend structure
- Tight consolidation (coiled energy)
- Clean accumulation patterns
- High probability of continuation
⚠️ Disclaimer
This indicator is a screening and analysis tool, not a trading system. It helps identify potential setups but does not provide entry/exit signals. Always:
- Verify volume at actual breakout
- Use proper position sizing
- Set stop losses
- Manage risk appropriately
- Do your own due diligence
Past performance does not guarantee future results.
📖 Credits
Based on Mark Minervini's Trend Template methodology and enhanced with modern breakout detection techniques. Original code/influence by yogy.frestarahmawan.
Happy Trading! 🚀
If you find this indicator useful, please give it a thumbs up and share your feedback!

CM Indicator매매에 중요한 여러 지표를 묶어 7개로 만들었습니다.
단기 매매라면 7번째 거래량 지표가 중요하며 손절가 익절가는
모든 지표를 켜셔서 확인하시면 좋습니다
Several important indicators for trading were grouped into seven.
If it's a short-term trade, the 7th volume indicator is important, and the sell-off price is
You can check all the indicators by turning them on

Trend detection zero lag Trend Detection Zero-Lag (v6)
Trend Detection Zero-Lag is a high-performance trend identification indicator designed for intraday traders, scalpers, and swing traders who require fast trend recognition with minimal lag. It combines a zero-lag Hull Moving Average, slope analysis, swing structure logic, and adaptive volatility sensitivity to deliver early yet stable trend signals.
This indicator is optimized for real-time decision-making, particularly in fast markets where traditional moving averages react too slowly.
Core Features
🔹 Zero-Lag Trend Engine
Uses a Zero-Lag Hull Moving Average (HMA) to reduce lag by approximately 40–60% versus standard moving averages.
Provides earlier trend shifts while maintaining smoothness.
🔹 Multi-Factor Trend Detection
Trend direction is determined using a hybrid engine:
HMA slope (momentum direction)
Rising / falling confirmation
Swing structure detection (HH/HL vs LH/LL)
ATR-adjusted dynamic sensitivity
This approach allows fast flips when conditions change, without excessive noise.
Adaptive Volatility Sensitivity
Sensitivity dynamically adjusts based on ATR relative to price
In high volatility: faster reaction
In low volatility: smoother, more stable trend state
This ensures the indicator adapts across:
Trend days
Range days
Volatility expansion or contraction
Trend Duration Intelligence
The indicator tracks historical trend durations and maintains a rolling memory of recent bullish and bearish phases.
From this, it calculates:
Current trend duration
Average historical duration for the active trend direction
This helps traders gauge:
Whether a trend is early, mature, or extended
Probability of continuation vs exhaustion
Strength Scoring
A normalized Trend Strength Score (0–100) is calculated using:
Zero-lag slope magnitude
ATR normalization
This provides a quick read on:
Weak / choppy trends
Healthy trend continuation
Overextended momentum
Visual Design
Color-coded Zero-Lag HMA
Bullish trend → user-defined bullish color
Bearish trend → user-defined bearish color
Designed for dark mode / neon-style charts
Clean overlay with no clutter
Trend Detection Zero-Lag is built for traders who need:
Faster trend recognition
Adaptive behavior across market regimes
Structural confirmation beyond simple moving averages
Clear, actionable visual signals

King OscillatorKing Oscillator is a streamlined, non-overlay indicator designed to capture bullish momentum and bear-pressure via:
A normalized Heikin-Ashi-based tradeable trend filter
A fast-reacting custom MA variant
EMA oscillators, each scaled for cross-timeframe consistency
A bear-pressure line (blend of intrabar and group-range bears)
Combined Volume Flow and Price vs. VWAP oscillators

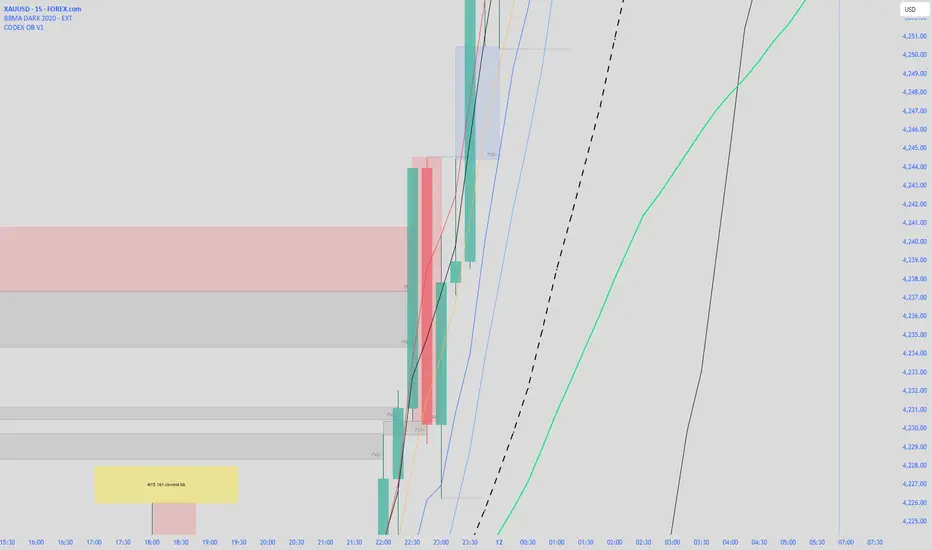
CODEX OB V1CODEX OB V1 is a multi-purpose Smart Money Concepts (SMC) indicator that automatically detects and visualizes key institutional trading elements such as Order Blocks, Fair Value Gaps, Rejection Blocks, Break of Structure, Pivots, High Volume Bars, and several qualitative SMC signals.
This tool helps traders identify institutional footprints and displacement-based setups with high clarity.
The Abramelin Protocol [MPL]"Any sufficiently advanced technology is indistinguishable from magic." — Arthur C. Clarke
🌑 SYSTEM OVERVIEW
The Abramelin Protocol is not a standard technical indicator; it is a "Technomantic" trading algorithm engineered to bridge the gap between 15th-century esoteric mathematics and modern high-frequency markets.
This script is the flagship implementation of the MPL (Magic Programming Language) project—an open-source experimental framework designed to compile metaphysical intent into executable Python and Pine Script algorithms.
Unlike traditional indicators that rely on arbitrary constants (like the 14-period RSI or 200 SMA), this protocol calculates its parameters using "Dynamic Entity Gematria." We utilize a custom Python backend to analyze the ASCII vibrational frequencies of specific metaphysical archetypes, reducing them via Tesla's 3-6-9 harmonic principles to derive market-responsive periods.
🧬 WHAT IS ?
MPL (Magic Programming Language) is a domain-specific language and research initiative created to explore Technomancy—the art of treating code as a spellbook and the market as a chaotic entity to be tamed.
By integrating the logic of ancient Grimoires (such as The Book of Abramelin) with modern Data Science, MPL aims to discover hidden correlations in price action that standard tools overlook.
🔗 CONNECT WITH THE PROJECT:
If you are a developer, a trader, or a seeker of hidden knowledge, examine the source code and join the order:
• 📂 Official Project Site: hakanovski.github.io
• 🐍 MPL Source Code (GitHub): github.com
• 👨💻 Developer Profile (LinkedIn): www.linkedin.com
🔢 THE ALGORITHM: 452 - 204 - 50
The inputs for this script are mathematically derived signatures of the intelligence governing the system:
1. THE PAIMON TREND (Gravity)
• Origin: Derived from the ASCII summation of the archetype PAIMON (King of Secret Knowledge).
• Function: This 452-period Baseline acts as the market's "Event Horizon." It represents the deep, structural direction of the asset.
• Price > Line: Bullish Domain.
• Price < Line: Bearish Void.
2. THE ASTAROTH SIGNAL (Trigger)
• Origin: Derived from the ASCII summation of ASTAROTH (Knower of Past & Future), reduced by Tesla’s 3rd Harmonic.
• Function: This is the active trigger line. It replaces standard moving averages with a precise, gematria-aligned trajectory.
3. THE VOLATILITY MATRIX (Scalp)
• Origin: Based on the 9th Harmonic reduction.
• Function: Creates a "Cloud" around the signal line to visualize market noise.
🛡️ THE MILON GATE (Matrix Filter)
Unique to this script is the "MILON Gate" toggle found in the settings.
• ☑️ Active (Default): The algorithm applies the logic of the MILON Magic Square. Signals are ONLY generated if Volume and Volatility align with the geometric structure of the move. This filters out ~80% of false signals (noise).
• ⬜ Inactive: The algorithm operates in "Raw Mode," showing every mathematical crossover without the volume filter.
⚠️ OPERATIONAL USAGE
• Timeframe: Optimized for 4H (The Builder) and Daily (The Architect) charts.
• Strategy: Use the Black/Grey Line (452) as your directional bias. Take entries only when the "EXECUTE" (Long) or "PURGE" (Short) sigils appear.
Use this tool wisely. Risk responsibly. Let the harmonics guide your entries.
— Hakan Yorganci
Technomancer & Full Stack Developer

BTC Impulse Pro
BTC Impulse Pro — Precision Breakout Tool for Bitcoin (5m–15m)
BTC Impulse Pro is a structured breakout companion designed to help traders identify directional shifts and continuation opportunities on intraday Bitcoin charts.
The indicator focuses on clean visual signals, consistent rules, and intuitive workflow integration — without revealing proprietary logic.
Included Setups
1. Standard Breakout Signal
A large directional triangle.
This setup triggers when price shows a clean breakout and confirmation pattern.
It is the primary trading signal of the tool and reflects moments of strong directional intent.
2. Wick Breakout Signal
A smaller directional triangle.
This setup appears when price interacts with a key level through a wick rejection before breaking out.
It can highlight momentum shifts early, but requires additional caution in choppy market phases.
3. Confluence Dot
A small directional dot.
This appears when internal structure conditions align with the prevailing directional bias.
The Confluence Dot can:
act as secondary confirmation for the two breakout signals
or be used as its own standalone signal
However, because it may appear during early or developing moves, users should evaluate market context carefully before acting on it.
EMA Stack & Trend Context
The indicator includes an optional EMA stack that helps visualize directional strength and transitions.
While not required for signals, the EMA 200 often acts as a dynamic boundary — when price trades very close to it, users should treat all signals with increased caution due to higher whipsaw risk.
Dynamic Stop & TP Guides
Suggested Stop and Take-Profit levels are automatically displayed when structure confirms.
These levels are meant as orientation tools, not strict requirements.
Different volatility conditions may require different management techniques, so users are encouraged to test what works best for their style.
NY Reference Line (00:00 NY Time)
The vertical reference line can be shifted via the NY Offset setting.
It should be aligned with 00:00 New York time for consistent daily segmentation across different time zones and chart feeds.
Recommended Timeframes
Optimized for 5m and 15m, but can also be tested on other timeframes depending on market structure and volatility.
Usage Notes
This indicator is not financial advice.
All signals should be interpreted within broader market context.
The tool does not execute trades — it assists with visual decision-making.


EMA Convergence EstimatorEMA Convergence Estimator is a tool designed to help traders visualize when two key trend EMAs—typically the 50-EMA and 200-EMA—are moving toward or away from each other. By analyzing slope, distance, and rate of convergence, the script estimates how many candles, hours, or days remain until the EMAs potentially touch.
This can be helpful for identifying upcoming trend shifts, tightening market conditions, or periods where momentum may be compressing before a larger move.
🔍 Features
Fast EMA & Slow EMA (default 50 / 200)
EMA distance tracking
Slope-based convergence calculation
Estimated time until EMAs meet in:
📍 Candles
⏱️ Hours
📅 Days
Real-time label panel showing all values
On-chart EMA cross markers
“+” printed directly on bullish EMA crosses
“–” printed directly on bearish EMA crosses
Fully transparent label background so it does not obstruct candles
📈 Use Cases
Identifying when EMAs are tightening (consolidation)
Spotting potential future crossovers earlier than normal indicators
Estimating momentum compression or expansion
Tracking longer-term trend dynamics on any timeframe
⚠️ Notes
The convergence estimate is mathematical, not predictive.
EMAs react to price — they do not forecast it.
Results depend on current slope and can change rapidly as new candles form.
Always use this tool as part of a broader analysis process.
This script is for educational purposes only and does not constitute financial advice.

Pivots + MAs ISRSPivots + MAs ISRS is a complete market-structure tool designed for traders who want clear institutional levels combined with trend confirmation from moving averages and Fibonacci zones.
This indicator helps you identify breakouts, pullbacks, and reversal points with much higher accuracy.
It combines the best of three worlds:
🔹 1. Advanced Pivot Points (Standard TV Engine)
Includes every major professional pivot type:
Traditional
Fibonacci
Woodie
Classic
DM
Camarilla
You can choose pivot anchors such as:
Daily, Weekly, Monthly, Quarterly, Yearly, and extended periods (2, 3, 5, and 10 years).
✔ Fully customizable colors
✔ Show/hide each level individually
✔ Dynamic labels (left or right)
✔ Works with intraday + extended sessions
🔹 2. Built-in Moving Averages
The indicator includes:
3 EMAs to measure trend direction and momentum
A 5-period SMA for micro-structure and scalping precision
Great for identifying confluences between trend direction + pivot levels.
🔹 3. FiboISRS Zones
Fibonacci-based zones designed to enhance price-reaction detection:
Retracement levels
Liquidity zones
Confluences with EMAs + Pivot Points
Perfect for spotting high-probability reversal areas.
🎯 What This Indicator Helps You Do
✔ See active institutional levels on any timeframe
✔ Detect real breakouts (not fakeouts) using Pivots + MAs
✔ Identify clean pullbacks into key zones
✔ Spot reactions at S1/S2/S3 or R1/R2/R3
✔ Keep your chart clean with minimal noise
Works extremely well on:
Crypto with solid liquidity
Major indices (SPX, NASDAQ, Dow)
Forex
Gold and commodities
🧠 Pro Tip
The highest-probability setups occur when price touches:
👉 A Pivot Level
👉 An EMA (20, 50, or 200)
👉 A FiboISRS zone
When these three overlap, the market often reacts strongly.
⚡ Creator
Indicator created by Ismael Robles (ISRS) to bring a clean, institutional-grade structure to everyday traders.

Momentum by Trading BiZonesSqueeze Momentum Indicator with EMA
Overview
The Squeeze Momentum Indicator with EMA is a powerful technical analysis tool that combines the original Squeeze Momentum concept with an Exponential Moving Average (EMA) overlay. This enhanced version helps traders identify market momentum, volatility contractions (squeezes), and potential trend reversals with greater precision.
Core Concept
The indicator operates on the principle of volatility contraction and expansion:
Squeeze Phase: When Bollinger Bands move inside the Keltner Channel, indicating low volatility and potential energy buildup
Expansion Phase: When momentum breaks out of the squeeze, signaling potential directional moves
Key Components
1. Squeeze Momentum Calculation
Formula: Momentum = Linear Regression(Close - Average Price)
Where Average Price = (Highest High + Lowest Low + SMA(Close)) / 3
Visualization: Histogram bars showing positive (green) and negative (red) momentum
Zero Line: Represents equilibrium point between buyers and sellers
2. EMA Overlay
Purpose: Smooths momentum values to identify underlying trends
Customization:
Adjustable period (default: 20)
Toggle on/off display
Customizable color and line thickness
Cross Signals: Buy/sell signals when momentum crosses above/below EMA
3. Volatility Bands
Bollinger Bands (20-period, 2 standard deviations)
Keltner Channels (20-period, 1.5 ATR multiplier)
Squeeze Detection: Visual background shading when BB are inside KC
Trading Signals
Buy Signals (Green Upward Triangle)
Momentum histogram crosses ABOVE EMA line
Occurs during or after squeeze release
Confirmed by expanding histogram bars
Sell Signals (Red Downward Triangle)
Momentum histogram crosses BELOW EMA line
Often precedes market downturns
Watch for increasing negative momentum
Squeeze Warnings (Gray Background)
Market in low volatility state
Prepare for potential breakout
Direction indicated by momentum bias
Indicator Settings
Main Parameters
Length: Period for calculations (default: 20)
Show EMA: Toggle EMA visibility
EMA Period: Smoothing period for EMA
Visual Settings
Histogram color-coding based on momentum direction
EMA line color and thickness
Signal marker size and visibility
Squeeze zone background display
Practical Applications
Trend Identification
Uptrend: Consistently positive momentum with EMA support
Downtrend: Consistently negative momentum with EMA resistance
Range-bound: Oscillating around zero line
Entry/Exit Points
Conservative Entry: Wait for squeeze release + EMA crossover
Aggressive Entry: Anticipate breakout during squeeze
Exit: Opposite crossover or momentum divergence
Risk Management
Use squeeze zones as warning periods
EMA crossovers as confirmation signals
Combine with support/resistance levels
Advanced Interpretation
Momentum Strength
Strong Bullish: Tall green bars above EMA
Weak Bullish: Short green bars near EMA
Strong Bearish: Tall red bars below EMA
Weak Bearish: Short red bars near EMA
Divergence Detection
Price makes higher high, momentum makes lower high → Bearish divergence
Price makes lower low, momentum makes higher low → Bullish divergence
Squeeze Characteristics
Long squeezes: More potential energy
Frequent squeezes: Choppy market conditions
No squeezes: High volatility, trending markets
Recommended Timeframes
Scalping: 1-15 minute charts
Day Trading: 15-minute to 4-hour charts
Swing Trading: 4-hour to daily charts
Position Trading: Daily to weekly charts
Best Practices
Confirmation
Use with volume indicators
Check higher timeframe direction
Wait for candle close confirmation
Filtering Signals
Ignore signals during extreme volatility
Require minimum bar size for crossovers
Consider market context (news, sessions)
Combination Suggestions
With RSI: Confirm overbought/oversold conditions
With Volume Profile: Identify high-volume nodes
With Support/Resistance: Key level reactions
With Trend Lines: Breakout confirmations
Limitations
Lagging indicator (based on past data)
Works best in trending markets
May give false signals in ranging markets
Requires proper risk management
Conclusion
The Squeeze Momentum Indicator with EMA provides a comprehensive view of market dynamics by combining volatility analysis, momentum measurement, and trend smoothing. Its visual clarity and customizable parameters make it suitable for traders of all experience levels seeking to identify high-probability trading opportunities during volatility contractions and expansions.

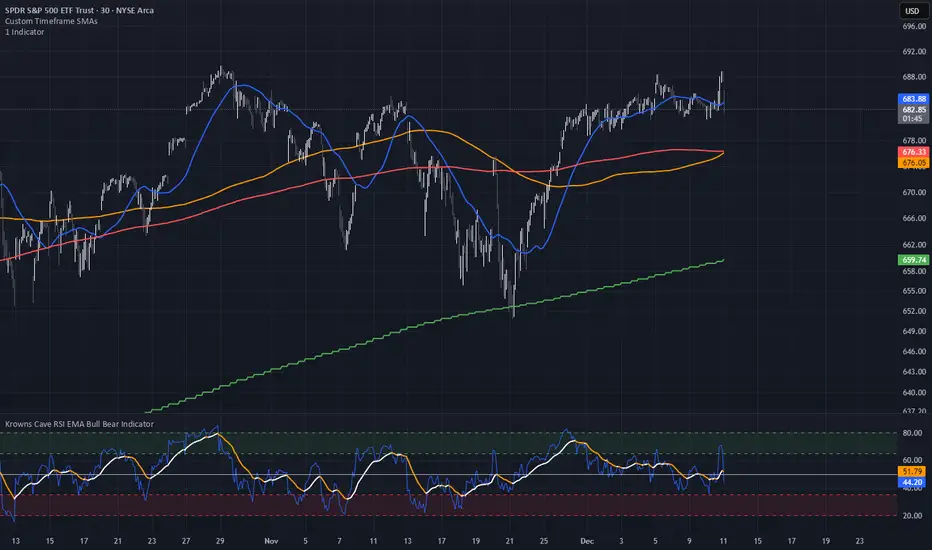
Custom Timeframe SMAsThis indicator plots up to three Simple Moving Averages (SMAs), each calculated from a user-selected timeframe and displayed on the current chart. This allows you to visualize higher- or lower-timeframe SMAs without switching charts.
Features
Three fully customizable SMAs with alerts
Each SMA has its own:
Length
Timeframe
Color
Line thickness
On/Off toggle
Use Cases
View higher timeframe SMAs (e.g., 1-hour 50 SMA on a 5-minute chart)
Combine trend signals across multiple timeframes
Track dynamic support/resistance from different timeframes
Enhance scalping, day trading, or swing trading setups