🔍 Market Context
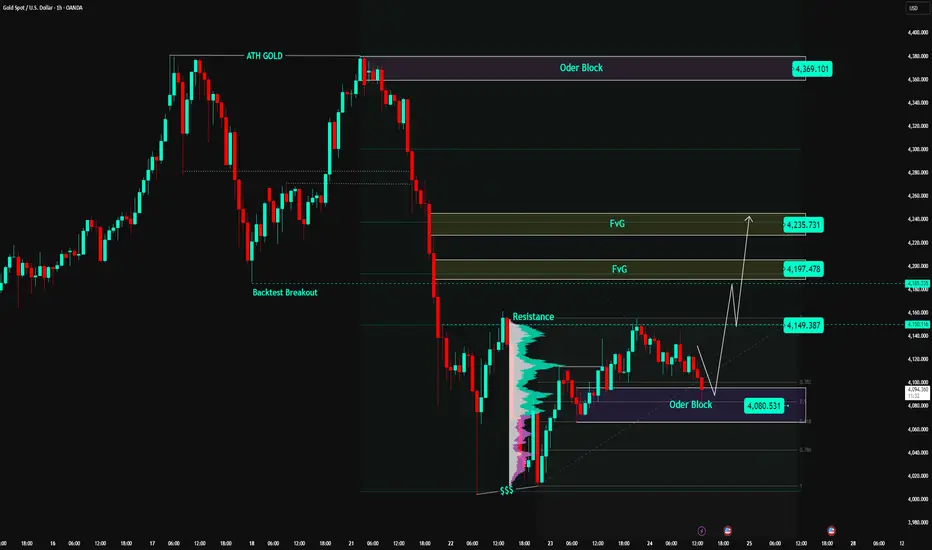
After a sharp decline from the ATH GOLD 4,371 USD peak, gold has completed a liquidity sweep around the 4,010 USD bottom and formed a stable accumulation zone above the Order Block 4,080 USD.
The buyers are gradually regaining control as the price holds firm at the OB and shows signs of short-term supply absorption.
The Resistance 4,149 USD zone is currently a temporary barrier; if successfully breached – gold could trigger a recovery wave towards the Fair Value Gap (FVG) zones at 4,197 and 4,235 USD.
The current price structure leans towards a bullish retracement structure – prioritising buy orders when the price reacts from the active demand zone.
💎 Key Technical Structure
Order Block (OB): 4,080 – 4,085 USD → crucial support zone, confluence with Fibo 0.786, serving as an accumulation base.
Resistance (Breakout Level): 4,149 USD → confirmation zone for upward direction, requires decisive breakout.
FVG1: 4,197 – 4,210 USD → first target, short-term supply test zone.
FVG2: 4,225 – 4,235 USD → confluence resistance zone, potential profit-taking for recovery wave.
ATH GOLD: 4,371 USD → long-term resistance, expanded target if the market maintains strong buying flow.
Overall Structure:
→ Short-term: bullish recovery.
→ Medium-term: re-accumulation after a deep correction phase.
📈 Trading Scenarios
1️⃣ BUY Setup #1 – Retest Order Block 4,080 USD
Entry: 4,080 – 4,085
SL: 4,060
TP1: 4,149
TP2: 4,197
TP3: 4,235
✅ Condition:
Wait for the price to retrace to the OB zone and show clear bullish reversal signals (rejection or bullish engulfing).
➡️ This is a classic “Buy the Dip” setup – aligning with the recovery structure, with high probability due to OB + strong Fibonacci confluence.
2️⃣ BUY Setup #2 – Break & Retest zone 4,149 USD
Entry: 4,149 – 4,155
SL: 4,130
TP1: 4,197
TP2: 4,235
✅ Condition:
Price breaks through the 4,149 resistance zone with good volume and lightly retests, without closing candles below 4,130.
➡️ Trend-following setup, aligning with the flow when the market confirms a short-term resistance break.
3️⃣ SELL Scalp – Reaction at FVG 4,235 USD (short-term)
Entry: 4,230 – 4,235
SL: 4,245
TP: 4,197 → 4,150
✅ Condition:
If gold reacts weakly and there is no follow-up buy at the FVG2 zone → a short-term technical sell can be considered on pullback.
➡️ Short-term sell – only execute if there is no confirmation of continued upward movement.
⚠️ Risk Management
Prioritise BUY according to the main structure (retracement bullish).
Do not FOMO buy within the zone (4,110 – 4,130).
If H1 closes candles below 4,060 → invalidates the bullish scenario, wait for structure reconstruction.
Maintain moderate order size when trading around the FVG zone to avoid noise.
💬 Conclusion
Gold is in the process of re-accumulation and preparing for a technical recovery phase.
As long as the price holds the Order Block 4,080 USD zone, the recovery structure remains valid, and the feasible target is 4,197 → 4,235 USD.
If it breaks through 4,235 USD, the market could extend the rally towards the 4,300 – 4,370 USD (ATH GOLD) zone.
👉 Reasonable Strategy:
Buy 4,080 → TP 4,197 / 4,235.
Buy more when 4,149 break confirms upward direction.
Sell short reaction at 4,235 if there is no signal of continued break.
🔥 “Patience at the base — profits come to those who wait for the OB reaction.”
⏰ Timeframe: 1H
📅 Update: 24/10/2025
✍️ Analysis by: Captain Vincent
Join Real - Time Trade Post: t.me/+vPyQJ6Ohb-RkMjNl
🔥 3 - 4 DAILY TRADE
🔥 15 - 20 SCALPING SIGNALS
🔥 Real - Time Proceed Orders
🔥 3 - 4 DAILY TRADE
🔥 15 - 20 SCALPING SIGNALS
🔥 Real - Time Proceed Orders
Related publications
Disclaimer
The information and publications are not meant to be, and do not constitute, financial, investment, trading, or other types of advice or recommendations supplied or endorsed by TradingView. Read more in the Terms of Use.